


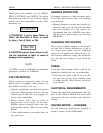


MARK V – MOUNTED OVERARM PIN ROUTER 555970
11
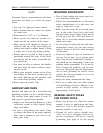
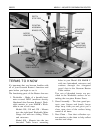
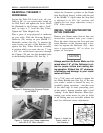
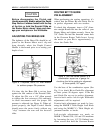
4. Motor Brackets – Firmly hold any
round, hand-held router motor from
2-1/2" to 4" in diameter. These dimen-
sions are for the motor only (the router
base is removed during operations).
5. Brass Gib – Adjusts with four Allen set
screws to eliminate side-to-side move-
ment of the motor while allowing
smooth, vertical movement of the dove-
tail slide.
6. Depth Stop Rod – Locks into any po-
sition to limit your depth-of-cut during
operations.
7. Dovetail Assembly – Moves up-and-
down by means of a steel rack-and-pin-
ion gear mechanism. The dovetail slide
provides 3-1/2" of vertical motor travel.
8. Depth Control Handle – Conveniently
raises and lowers the router motor. A
simple twist locks the handle in place.
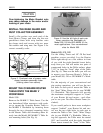
9. Circular Table Inserts – Two provided:
One with a 1-3/8" diameter center hole
and an offset threaded insert for the
Starting Pin (included)...and another
with a center threaded insert for the
three interchangeable Overarm routing
Guide Pins (three included: 1/4", 3/8"
and 1/2" diameters).
10. Two-Piece Router Fence – Adjustable
aluminum Fences attach to the Work-
table mounting holes with threaded
plastic Knobs, Spacers and washers for
straight-line routing operations.
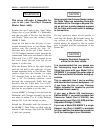
11. MARK V Way Tube Mounting Brack-
ets – Upper and lower Mounting Brack-
ets attach to the Overarm...then around
the MARK V Way Tubes with mating
Clamps, supporting the Overarm
Router above the Worktable.
12. Mounting Bracket Clamps – Clamp
around the “back side” of your Way
Tubes with 3" long x 3/8" dia. socket
head capscrews, threaded into the holes
on the back sides of the Mounting
Brackets.
13. SLIDING T-Nuts – Used to attach your
Overarm Router Table to your Model
505, 510 or 520 MARK V Worktable.
OVERARM ROUTER
ASSEMBLY
WARNING
Your safety and the ability to use your
new Shopsmith Overarm Pin Router
properly depends on your following
these assembly and use instructions
exactly.
NOTE
Reference numbers that appear in paren-
theses following the part names correspond
with the numbers on the figures in this sec-
tion and the exploded view in the Parts List
section of this Manual.
TOOLS & SUPPLIES NEEDED:
• 1/8" Allen wrench
• 5/32" Allen wrench
• 1/4" Allen wrench
• 5/16" Allen wrench
• 7/16" Open end wrench
• Furniture or floor paste wax (do NOT use
car wax or spray furniture polish)
• Mineral spirits
• Fine file or emery cloth (optional)