


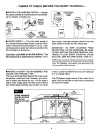
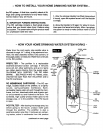


- HOW TO INSTALL YOUR HOME DRINKING WATER SYSTEM -
tighten the nut. NOTE: Cut tubing as needed for
neat appearance, but keep long enough to alllow
easy service of the RO system.
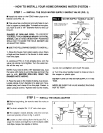
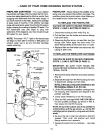
7. If needed, cut the 1/4" tubing (marked "1/4"
BARB ON FAUCET") to length. Then, push the end
all the way onto the 1/4" barb fiting on the faucet.
8. Take the 27" long separate piece of 3/8" tubing
and pass 1 end down through the faucet support.
Push the other end all the way onto the 3/8"barb
fitting on the faucet.
9. Feed the faucet base leadwire down through the
faucet support.
10. Lower the faucet and base down onto the faucet
support, carefully working the tubing and leadwire
through the support. Use the 5/8" long screw to
fasten base and support together. Insert the but-
ton, removed from the support in step 1, into the
hole to cover the screw.
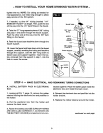
faucet base -_
1/4" barb
fitting
3/8" barb
fitting
washer
tubing
3/8"
faucet su
NOTE:FOREASE
OFSERVIC_AND
MAINTENANCE,KEEP
TUBINGLENGTHSLONG
ENOUGHSOREMOVALOF
THEROSYSTEMFROM
UNDERTNt5SINHIS
POSSIBLE.
1/4" tubing
(1/4" BARB
318" tubing,
27" long
button
faucet base
leadwire
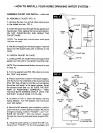
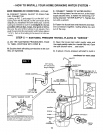
STEP 4 -- MAKE ELECTRICAL, AND REMAINING TUBING CONNECTIONS
A. INSTALL BATTERY PACK iN ELECTRONIC
BOX.
nectors together. Place the battery pack inside the
electronic box and install the back cover.
1. Looking at FiG. 7, page 10, remove the rubber
retainer holding the electronic box and postfilter in
the holder.
2. Pull the electronic box from the holder and
remove the back cover.
4. Reinsert the electronic box and postfilter into the
holder bracket.
5. Replace the rubber retainer around the holder.
3. Fasten the battery pack (BE SURE BATTERIES
ARE INSTALLED CORRECTLY, AS SHOWN ON
THE BATTERY HOLDER) and electronic box con-
continued on next page
9