


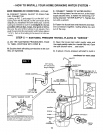
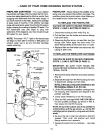
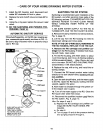


- CARE OF YOUR HOME DRINKING WATER SYSTEM -
RO MEMBRANE CARTRIDGE - The useful life
of the membrane cartridge depends mostly on the
pH (see page 17) of your supply water. The lower
the pH, the longer the membrane will last. For ex-
ample, if the feed water has a pH of about 7.0, the
cartridge may last for over 1 year; but if the pH is
high, cartridge life may be shortened. The high pH
weakens the membrane and makes pin hole leaks.
NOTE: The amber "RO" light on the faucet base
will begin to flash when RO water quality drops so
less than 75% of the TDS are removed from the
supply water.
This reverse osmosis system contains a
replaceable treatment component critical for
effective removal of total dissolved solids. The
water should be tested periodically to verify
that the system is performing satisfactorily.
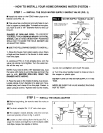
TO REPLACE THE RO CARTRIDGE
1. Refer to page 13 and follow instructions under
"To Replace the Prefilter Cartridge".
2. Remove and replace the flow control and screen
(see steps on this page).
3. Turn on the water supply and PURGE THE RO
CARTRIDGE... SEE PAGE 11.
BATTERIES IN ELECTRONIC BOX - Always
replace the batteries (4, "AA" alkaline) in the elec-
tronic control box after installing a new prefilter car-
tridge and postfilter. Good batteries assure proper
operation of the indicator lights. Removing the bat-
teries also resets the 6 month or 900 gallon period
for monitoring the filter cartridges. See FIG. 7 on
page 10.
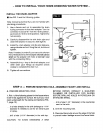
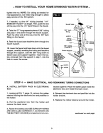
FLOW CONTROL - A clean flow control is a must
for the RO membrane to make high quality product
water. The flow control keeps water flow through
the membrane at the right rate to get the best quality
product water. If the control becomes plugged, so
water can't get through, it will only take a short time
for the RO membrane to become useless. A small,
cone-shaped screen is positioned over the flow con-
trol (FIG. 9) to help keep the flow control clean.
Every time you work on the RO system, check the
flow control and screen to make sure they are clean.
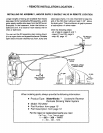
TO REPLACE FLOW CONTROL AND SCREEN
CAUTIONS: To install the screen, place the cone
end into the RO cap. Then carefully push it in us-
ing 1/4" tubing as a tool. Do not force in farther after
you feel resistance. Visually check to be sure it is
properly positioned.
When installing the flow control, tighten the nut by
hand, then another 1/4 to 1/2 turn with a pliers. DO
NOT OVERTIGHTEN AND DISTORT OR CRUSH
THE TUBING AND FLOW CONTROL.
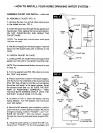
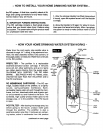
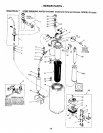
SERVICING THE BLADDER
If the bladder should require inspection and replace-
ment, use the following guides. Refer to the parts
illustration on page 18.
CAUTION: BE SURE TO RELIEVE PRESSURE,
STEPS 1,2 AND 3, Bo'n'OM OF PAGE 12.
1. Remove the vacuum relief valve (use 7/16"
socket).
2. Rotate the tank shutoff valve 90o and pull from
the RO housing.
3. Apply downward pressure on the RO cap while
rotating counterclockwise 90 o.
NOTE: If the cap turns in the RO housing, first do
steps 1 and 2 under "To Replace the Prefilter Car-
tridge", page 13.
4. Lift the RO housing out of the liner assembly and
PLACE WHERE CLEAN AND SANITARY.
5. Remove the bladder.
NOTE: BE SURE THE INNER SURFACE OF THE
REPLACEMENT BLADDER, AND THE OUTER
SURFACE OF THE RO HOUSING ARE CLEAN.
USE DISH SOAP AND HOT WATER TO CLEAN
AND RINSE.
6. Install the bladder into the liner assembly. Wet
the top bead of the bladder with water, or apply
a light coating of silicone grease.
14