


- CARE OF YOUR HOME DRINKING WATER SYSTEM -
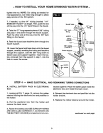
7. Install the RO housing, push downward and
rotate 900 clockwise to lock in place.
8. Replace the tank shutoff valve and rotate 900 to
lock.
9. Using the o-ring seal, replace the vacuum relief
valve.
10. DO THE SANITIZING AND PURGING PRO-
CEDURES, PAGE 10.
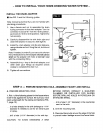
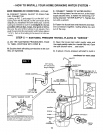
AUTOMATIC SHUTOFF SERVICE
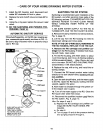
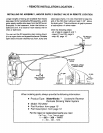
If the shutoff assembly, on the RO cap, requires ser-
vice, reassemble parts exactly as shown in FIG. 10.
Be sure to align indicated marks to properly torque
cap to RO cap.
arrow
align
holes
RO cad
phragm
plunger
support
- plunger
Lphragm
mark
p support
o-ring
WHEN INSTALLING CAP,
TIGHTEN BY HAND.
THEN, USE A PLIERS
TO TIGHTEN AND ALIGN
MARK ON CAP WITH
ARROW ON RO CAP
SANITIZING THE RO SYSTEM
Sanitizing is recommended upon installation of the
RO system, and after servicing inner parts of the
RO housing, and cap. IT IS IMPORTANT FOR THE
SERVICE PERSON TO HAVE CLEAN HANDS
WHILE HANDLING INNER PARTS OF THE
SYSTEM.
1. BE SURE WATER SUPPLY TO THE RO IS
TURNED OFF, AND THE RO FAUCET IS OPEN.
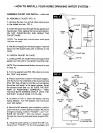
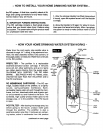
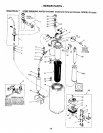
2. Remove the clamp retainers and clamp sections,
Fig, 9, page 13.
3. Lift the cap from the RO housing (no need to
disconnect tubing) and move aside.
NOTE: IF THE CAP O-RING SEAL REMAINED IN
THE RO HOUSING, REPLACE IT ON THE CAP.
4. Remove the RO cartridge and prefilter car-
tridge from the RO housing. If needed, flush hous-
ing with fresh, clean water.
5. Fill the RO housing, with fresh water, to about
1 inch from the top. Add 1.0 oz. of chlorine (ordinary
5,25% household bleach... Hilex, Clerox, etc.) and
mix in the water. DO NOT ADD CHLORINE FIRST.
Concentrated, it will attack plastics,
6. Replace the cap, with o-ring, and install the re-
taining clamps.
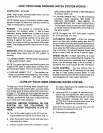
7. Connect the RO faucet product water tubing
directly to the tank shutoff valve, isolatinq the car-
bon postfilter.
8. Open the tank shutoff valve, and the water supply
to the RO. Open the RO faucet, locking the lever
upward, against the spout.
9. Allow water to circulate through the system un-
til the bleach odor is gone.
10. Turn off the water supply to the RO. Close the
RO faucet after water flow stops.
11. Reconnect the postfilter (replace used filter) to
the RO system, Fig. 9, page 13.
12a. Do steps 2 and 3.
b. Replace the RO cartridge and prefilter car-
tridge (BE SURE YOUR HANDS ARE
CLEAN).
c. Do step 6.
d. Turn to page 10 and do the pressure testing
and purging steps B through E.
15