


- CARE OF YOUR HOME DRINKING WATER SYSTEM -
PREFILTER CARTRIDGE - You must replace
the prefilter cartridge often to protect the RO mem-
brane from being destroyed bychlorine, and/or from
plugging with sediments from the water supply. If
you have chlorine in the water, replace the cartridge
at least every 6 months. If the prefilter cartridge
plugswith sediments, water flow intothe RO system
drops, slowing the making of quality RO water. The
RO membrane may also begin to plug with
sediments. If this happens, you may not get enough
RO water for your needs.
NOTE: The amber "FILT" light on the faucet base
will begin to flash after 6 months or 900 gallons of
product water use to tell you the filter cartridge
needs replacing.
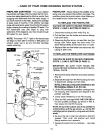
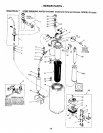
cone screen
RO Cap __
control
_riu:;w_ L_dbg_n e
protective
cap _ o-ring end down
vacuum
relief
prefilter
BOTTOM
END
(2)
--..clamp
section (2)
electronic
box
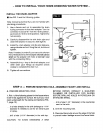
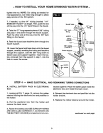
POSTFILTER - Always replace the postfilter at the
same time you replace the prefilter cartridge. The
postfilter gives the product water a final filtering of
any tastes and/or odors that may remain.
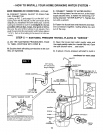
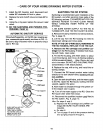
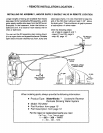
TO REPLACE THE POSTFILTER
CAUTION: BE SURE TO RELIEVE PRESSURE,
STEPS 1, 2 AND 3, Bo'n'OM OF PAGE 12.
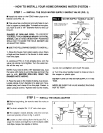
1. Disconnect tubing at both ends (Fig. 9).
2. Pull the filter from the holder and remove fittings
from both ends.
3. Observing the flow arrow, on new filter, turn the
fittings (use Teflon tape) into both ends. The
elbow fitting installs at the bottom end, or outlet.
4. Replace filter into the holder and reconnect the
tubing at both ends.
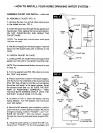
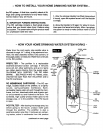
TO REPLACE THE PREFILTER CARTRIDGE
CAUTION: BE SURETO RELIEVE PRESSURE,
STEPS 1, 2 AND 3, BOTTOM OF PAGE 12.
IMPORTANT: BE SURE YOUR HANDS ARE
CLEAN BEFORE WORKING ON RO SYSTEM IN-
TERNAL PARTS.
1. Remove the clamp retainers and clamp sections
(Fig. 9).
2. Separate the cap from the RO housing (no need
to disconnect tubing) and set aside.
NOTE: If the cap o-ring seal remained in the
RO housing, replace it on the cap.
3. Lift the RO cartridge and prefilter cartridge from
the housing, then separate and dispose of the
prefilter cartridge.
4. Dump water remaining in the RO housing.
5. Slide the RO cartridge INTO THE TOP END of
the new prefilter cartridge, as shown in FIG. 9,
then place into the RO housing.
NOTE: Be sure the bottom end of the prefilter is
at the bottom, and the up arrow ( -_ ) on the RO
cartridge points upward (o-ring seal end down-
ward).
6. Be sure the cap o-ring has lubrication (silicone
grease). Then, push into position and install
clamp sections and retainers,
7. Replace the electronic box batteries.., see page
14.
13