


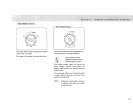


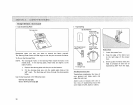
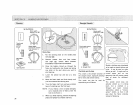


Straight Stitch
Set the Machine
Stitch width
control 0 or(_D
13 5
lop thread tension
control 2 to t3
H: Straight foot
NOTE:
Stitch length
control orange
zone
4.
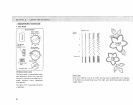
Stretch Stitch
Best sewing results are
obtained with the straight
stitch foot, but the zigzag
foot will also provide
acceptable results, and can
be used for all needle
positions.
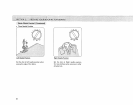
Before sewing with the straight stitch
foot, always set the stitch width
control to 0 or (_ to avoid breaking
the needle.
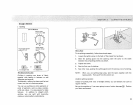
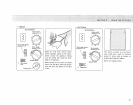
1. Raise the presser foot.
2. Raise the needle to its highest
position.
3. Place the edge of the fabric next
to a stitching guide line on the
needle plate (5/8" is most
common),
4. Draw the threads toward the back
and lower the presser foot.
5. Press the footcontroI.
6.
Hold the fabric loosely and gently
guide it along the guide line, so
that it feeds naturally,
Do not force the fabric or try to
pull it tight_
7.
8,
9.
At the beginning and end of
seam, you may want to reverse to
lock the stitch.
Raise the presser foot and remove
the fabric.
Cut the threads,
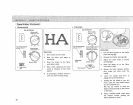
Use the Seam Guides
Cornering guide
The seam guides on the needle plate
are engraved to help you measure seam
width. The lines are 1/8" apart, with
the 5/8" and 7/8" lines marked.
• Turn a Square Corner
guide
To turn a square corner 5/8" from the
fabnc edge:
1. Stop stitching and lower the
needle by turning hand wheel
toward you when the fabric edge
facing you lines up with the
cornering guide, as shown,
2. Raise the presser foot and turn
the fabric to line the edge with
the 5/8" seam guide.
3. Lower the presser foot and begin
stitching in the new direction,
31