


DUALAIR
®
HEATING AND COOLING UNITS INSTALLATION OPERATION AND SERVICE MANUAL
28
SECTION 13: SERVICING
13.1 Servicing Instructions
After commissioning, the DualAir
®
unit will require
maintenance to be carried out annually. If the
DualAir
®
unit is used in a dirty or dusty area, more
frequent maintenance may be necessary.
Installation, service and annual inspection of heater
must be done by a contractor qualified in the
installation and service of gas-fired heating
equipment.
NOTE 1: After any maintenance or repair work
always test fire the heater in accordance with the
commissioning instructions on Page 21, Section 11
through Page 24, Section 11.9 to ensure all safety
systems are in working order before leaving the
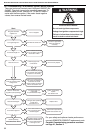
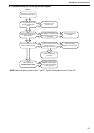
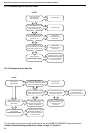
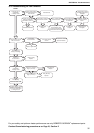
heater to operate. Minor faults may be traced by
using the troubleshooting charts on Page 31,
Section 15 through Page 34, Section 15.5.
NOTE 2: Check all gas pipes and pipe joints to
ensure there are no cracks or gas leaks.
NOTE 3: Inspect all suspended components and
hardware. Insure that they are in good condition,
properly tightened, and corrosion free.
13.1.1 Cooling Equipment
The cooling coil does not require maintenance
except that during filter replacement it is
recommended to clean the surface of the coil with a
soft brush and vacuum cleaner. Carry out any
maintenance recommended by the condenser
manufacturer.
13.1.2 Filters
The air filters should be inspected regularly to
ensure that no excessive build up of deposit is being
experienced. If heavy deposit is being formed, then
the filters may be cleaned using a vacuum cleaner.
Filters should be replaced at least every four months
to ensure that adequate air flow.
The cooling equipment will automatically turn off
should the air flow drop to a preset low value even
though the fan will still run. The maximum resistance
across a dirty filter should be no more than 150 Pa
(1.5 mbar) and the dirty filter warning light will be on.
A resistance higher than this indicates that the filters
must be replaced.
13.2 Burner Maintenance
1. Open the hinged door and remove the burner
compartment cover. See Page 37, Section 16.2.
2. Clean any deposits from the main burner which
may have formed in the injectors or venturi of
the burner. See Page 37, Section 16.2.
3. Remove the ignition electrode and flame probe.
Check condition of ignition electrode and flame
probe. Clean off any deposits which may have
been formed, check condition of ceramic
insulators. Replace as necessary.
13.3 Fan/Motor Assembly Maintenance
The main fan bearings are permanently sealed and
do not need lubrication. Before cleaning, turn off gas
and electrical supply. Remove the fan compartment
covers and use a small brush or duster to clean the
fan blades from each side. Replace fan(s) when
done.
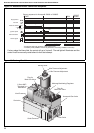
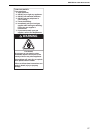
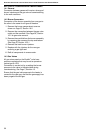
Figure 16: Belt Tension
Check the condition and tension of the drive belts.
The condition is best inspected with the belts
removed. Check for chaffing or lateral cracks.
Replace belts as a matched pair as necessary.
Do not over-tighten belts, as this may cause bearing
damage.
13.4 Heat Exchanger Maintenance
The heat exchanger will remain clean unless a
problem has developed with combustion. Inspect the
heat exchanger. Look for signs of overheating at the
front tubes which may indicate burner over firing or
persistently low air flows.
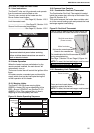
WARNING
Cut Hazard
Turn off gas and electrical supply before maintenance.
Fan can start automatically at any time.
Failure to follow these instructions can result in severe
injury or product damage.
Motor
Pulley
Fan
Pulley
8 mm to 10 mm