


Regency
®
F33-3 Freestanding Gas Stove 7
INSTALLATION
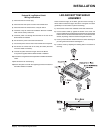
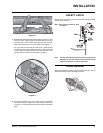
Pedestal & Leg/Bottom Shield
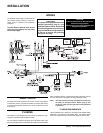
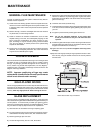
Wiring Instructions
1) Disconnect the fan harness plug.
2) Disconnect the 240V power cord from the terminal block
3) Disconnect the three wires from the 3-way fan switch.
4) Install the 3-way fan switch into the Bottom Shield or Pedestal.
Note: remove dummy switch fi rst.
5) Install the power cord through the small hole in the rear of the
Bottom Shield or Pedestal
6) Re-connect the power cord to the terminal block.
7) Ground the power cord and mount the terminal block if required.
8) Re-connect the 3 wires back to the 3-way fan switch (the white
wire is the middle connection).
9) Connect the yellow wire from the gas valve to the Burner
2-way switch supplied with the Bottom Shield or Pedestal.
10) Connect the orange wire from the spill switch to the Burner ON/OFF
switch.
11) Re-connect the fan harness plug.
12) Secure the power cord with the supplied grommet at the back of
the Bottom Shield or Pedestal.
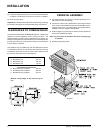
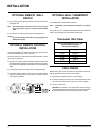
LEG AND BOTTOM SHIELD
ASSEMBLY
These instructions apply to the black, gold and nickel cast legs. It
will be easier to attach the legs to the stove if it is tipped on its back
(preferably on a soft surface to prevent scratching).
1) Remove the 4 bolts in the underside of the base and discard.
2) Put the bottom shield up against the bottom of the stove and
loosely install the four supplied bolts and washers into the threaded
holes in the four corners of the bottom the unit. Once the bolts are
started, slip the leg under the washer and tighten the bolts.
3) Hook up wires to Burner ON/OFF switch and valve assembly as
per wiring instructions above. See Diagram 1.
4) Level the stove by adjusting the levelling bolts in the bottom of
each leg.