


18
Regency
®
CLASSIC C33-3 Freestanding Gas Stove
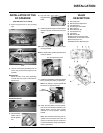
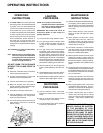
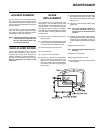
PILOT ADJUSTMENT
Periodically check the pilot fl ames. Correct
fl ame pattern has three strong blue fl ames:
1 fl owing around the thermopile, 1 around
the thermocouple and 1 fl owing across the
burner (it does not have to be touching the
burner).
Note: If you have an incorrect fl ame pat-
tern, contact your Regency
®
dealer
for further instructions.
Incorrect fl ame pattern will have small, prob-
ably yellow fl ames, not coming into proper
contact with the rear burner or thermopile
or thermocouple.
Top View of pilot fl ame
Top View of pilot fl ame
MAINTENANCE
GENERAL VENT
MAINTENANCE
Conduct an inspection of the venting system
at least annually. Recommended areas to
inspect are:
1) Check areas of the Venting System which
are exposed to the elements for corrosion.
These will appear as rust spots or streaks,
and in extreme cases, holes. These com-
ponents should be replaced immediately.
2) Remove the Cap, and shine a fl ashlight
down the Vent. Remove any birds nests,
or other foreign material.
3) Check for evidence of excessive condensa-
tion, such as water droplets forming in the
liner, and subsequently dripping out the
joints, Continuous condensation can cause
corrosion of caps, pipe, and fi ttings. It may
be caused by having excessive lateral runs,
too many elbows, or exterior portions of the
system being exposed to cold weather.
4) Inspect joints, to verify that no pipe sections
or fi ttings have been disturbed, and conse-
quently loosened. Also check mechanical
supports such as Wall Straps for rigidity.
CAUTION: ANY SAFETY SCREEN
OR GUARD REMOVED FOR SERV-
ICING AN APPLIANCE MUST BE
REPLACED PRIOR TO OPERAT-
ING THE APPLIANCE.
CLOTHING OR OTHER FLAM-
MABLE MATERIAL SHOULD NOT
BE PLACED ON OR NEAR THE
APPLIANCE.
NEVER OPERATE THE APPLIANCE
WITHOUT THE GLASS PROPERLY
SECURED IN PLACE.
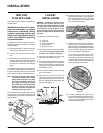
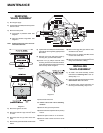
THERMOPILE /
THERMOCOUPLE
1) Loosen the thermocouple or thermopile with
a 7/16" wrench at bracket.
2) Disconnect thermocouple by loosening nut
from the valve with a 9mm wrench. Discon-
nect thermopile by loosening 2 screws
marked TP on the valve.
3) Drop the thermocouple or thermopile down
from the bracket and pull it out of the unit.
4) Reinstall the new ones in reverse order.
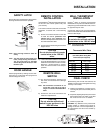
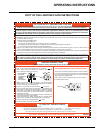
AERATION
ADJUSTMENT
The aeration adjustment rod is attached to the
air shutter on the burner. The air shutter adjust-
ment rod is located under the ashlip on the right
side. The rod is used to adjust the aeration on
the burner. This adjustment is performed by the
installer and is primarily used in installations at
high elevations. Push the rod in for a yellow
fl ame, or pull out on the rod for a bluer fl ame.
Air shutter opening:
Natural Gas 7/16"
Propane Wide open
Caution: Carbon will be produced if air shut-
ter is closed too much.
Note: Aeration Adjustment should only be
performed by an authorized Regency
®
Installer at the time of installation or
service.
Closed - Tall Yellow fl ame
Open - Short Blue fl ame