


March 2, 2007
7033-277C
Page 17
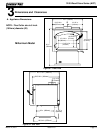
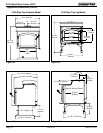
3100 Wood Stove Series (ACC)
R
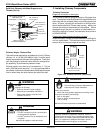
Thimble
Site constructed for masonry chimney installation:
Components
• A minimum length of 12 inches [305mm] (longer for
thicker walls) of solid insulated factory-built chimney
length constructed to UL 103 Type HT 8 inch (203mm)
inside diameter. Chimney needs to extend a minimum
of 2 inches (51mm) from the interior wall and a mini-
mum of 1 inch (25mm) from the exterior wall.
• Wall spacer, trim collar and wall band to fi t solid pack
chimney selected.
• Minimum 8 inch (203mm) diameter clay liner section (if
not already present in chimney) and refractory mortar.
Air Clearances
• Masonry chimney clearance must meet NFPA 211 mini-
mum requirement of 2 inches (51mm) to sheet metal
supports and combustibles.
• Minimum of 1 inch (25mm) clearance around the chim-
ney connector.
• Top of wall opening is a minimum of 13-1/2 inches
(343mm) from ceiling or 4-1/2 inches (114mm) below
minimum clearance specifi ed by chimney connector
manufacturer. NFPA 211 minimum vertical clearance of
18 inches (457mm) from chimney connector and ceil-
ing or minimum recommended by chimney connector
manufacturer. Figure 17.1.
Instructions:
1. Open inside wall at proper height for the chimney con-
nector to entry the masonry chimney. Figure 17.1
2. Entry hole to masonry chimney must be lined with an 8
inch (203mm) minimum diameter clay liner, or equiva-
lent, secured with refractory mortar.
3. Construct a 17 inch x 17 inch (432mm x 432mm) out-
side dimension frame from 2 x 2 framing lumber to
fi t into wall opening. Inside opening of frame should
be no less than 14 inch x 14 inch (356mm x 356mm).
Figure 17.1.
4. Attach the wall spacer to the chimney side of the
frame.
5. Nail the frame into the wall opening. The spacer should
be on the chimney side.
6. Insert the section of the solid insulated chimney into
the outer wall of the masonry chimney.
7. Tightly secure the length of the solid insulated chimney
with the wall band to the masonry chimney.
8. Insert a section of chimney connector into the chimney.
Make sure it does not protrude past the edge of the
clay chimney liner inside the chimney.
9. Seal the end of the chimney connector to the clay liner
with refractory mortar.
10.
Install trim collar around the sold pack chimney section
.
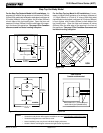
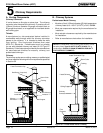
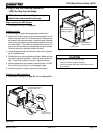
Figure 17.1
Trim Collar
Chimney Section
with 2 inch
(51mm)
Clearance to
Combustibles
Chimney
Connector
Fire Clay Flue
Liner
with Airspace
Masonry
Chimney
Wall Band to
Secure Chimney
Section
Wood Studs Used
for Framing - Spaced
2 inch (51mm)
clearance from
Masonry Chimney
Wall Spacer
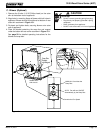
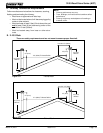
Solid Pack Chimney with Metal Supports as a Thimble
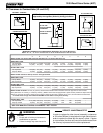
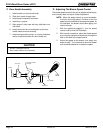
Figure 17.2
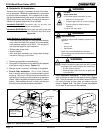
Fire Risk.
Do NOT pack insulation or other combustibles between
spacers.
• ALWAYS maintain specifi ed clearances around vent-
ing and spacers.
• Install spacers as specifi ed.
Failure to keep insulation or other material away from
vent pipe may cause fi re.
WARNING
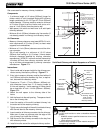
1.5”
1.0”
2.0”
2.0”
1.5”
14.0” ID
17.0” OD
ceiling
Minimum18.0”
NFPA 211
13.5” below ceiling to top
of opening
1.0”
8.0”
1.5 2x2 framing stud
2.0 min air clearance
1.0 min air clearance
4.5
or top of opening is a min.of
4.5” below min.clearance
specified by connector mfg.
Center of Hole
Thimble
C
L
C
L
Wall
Include depth
of hearth pad