


9
W415-0806 / 06.28.09
While the liners must be continuous from the appliance to the chimney cap,
to achieve the needed length, they may be coupled, using an approved
coupler.
We recommend that exhaust vents that pass through unheated spaces,
such as tall exterior chimneys, be wrapped in a protective sleeve to mini-
mize condensation and reverse fl ow symptoms. See Trouble Shooting for
details.
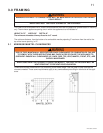
This appliance is approved for use with a 2" liner for air intake and a 3" liner
for exhaust. For best performance, however, it is recommended to use two
3" liners.
If a 2" liner is used for the intake, it may be necessary to adjust the primary
air shutter.
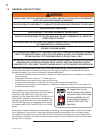
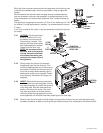
2.2.1 OUTSIDE: Slip the one end of
a liner a minimum of 2" over
the sleeve of the air terminal.
Secure using 3 screws. Then
seal the joint and screw heads
with high temperature sealant.
Repeat with the other liner.
NOTE: We recommend that
the other end of the exhaust
liner be marked to eliminate
the exhaust liner being con-
nected to the intake collar at
the appliance.
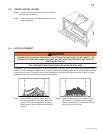
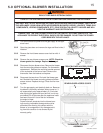
2.2.2 Gently stretch the liners to the required
lengths and insert into the chimney. Trim
and fi t the fl ashing plate to suit the chimney
termination. Place the air terminal onto the
top of the chimney. Make weather tight by
sealing with caulking (not supplied). Fasten
to the chimney with screws and plugs (not
supplied).
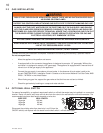
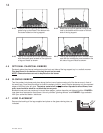
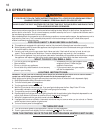
2.2.3 INSIDE: Remove the securing screw from
the front of the vent mounting plate. Pull the
vent mounting plate only, back into the track,
to the front stop. Start the slider back into
position. Re-secure the screw. The insert
may now be pushed into its fi nal position
inside the wood burning appliance, and the
screw tightened until the slider has been pulled tight to the front stop.
2.2.4 Route the fl ex liners through the slider. Attach and secure the liners to the vent mounting plate using
the same procedure as before, ensuring that the marked exhaust liner is attached to the exhaust collar.
FLASHING
PLATE
2” OVERLAP
SEALANT
HI-TEMP
INTAKE
EXHAUST
MOUNTING
PLATE
SECURING
SCREW
INTAKE
EXHAUST
2"
OVERLAP
HI-TEMP
SEALANT
2"
LINER
3"
LINER
SLIDER
REDUCER
CONNECTION
ILLUSTRATED WITH A 2"
INTAKE LINER.