


4
Afterwards, clean the area around the hole with detergent or alcohol.
This will establish a good surface for the adhesive.
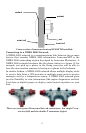
5. Using a high quality, marine-grade above- or below-waterline seal-
ant/adhesive compound, apply a 1/8" (3 mm) bead of sealant around the
lip of the EP-80R TH housing.
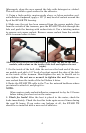
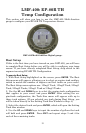
6. Make sure the nut has been removed from the sensor module, then
from the outside of the transom, pass the EP-80R TH cable through the
hole and push the housing with sealant into it. Use a twisting motion
to squeeze out excess sealant. Remove excess sealant from the outside
of the transom before it dries.
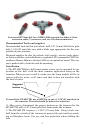
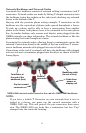
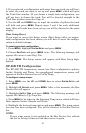
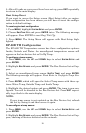
Slide the nut over the red connector (left); Place the nut on the sensor
module, add sealant on the inside of the hull and tighten the nut
(right).
7. On the inside of the hull, slide the nut over the back end of the sen-
sor module and add a 1/8" bead of sealant around the edge of the hole
on the inside of the transom. Hand-tighten the nut; be careful not to
over-tighten. Do not use a wrench to tighten the nut! Remove ex-
cess sealant from the inside of the hull before it dries.
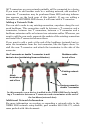
8. Route the EP-80R TH cable to the T on the network backbone where
you intend to attach it, and plug it in.
NOTE:
Allow marine grade sealant/adhesive compound to dry for 12 hours
before taking your boat out on the water.
9. Check for leaks! After the boat is placed in the water, check for
leaks immediately. Check the boat for leaks again several times during
the next 24 hours. If you notice any leakage at all, the EP-80R TH
should be re-installed with a new coat of adhesive.