


Installation & Operation Manual
2 Prepare boiler
12
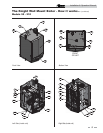
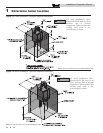
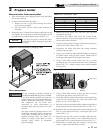
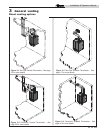
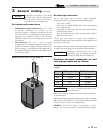
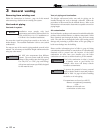
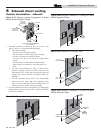
Figure 2-4 Mounting the Boiler
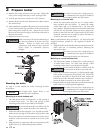
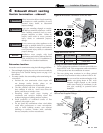
Figure 2-3 Installing Propane Orifice
13. Reattach the wiring connector to the gas valve. Tighten the
screw on the wiring connector to secure to the gas valve.
14. Turn the gas valve power switch to the “ON” position.
15. Reattach the bezel to the unit. Reconnect the ribbon cable to
the control board.
16. After installation is complete, fill out the gas conversion label
(in the conversion kit bag) and affix it to the unit under the
boiler rating plate inside the unit. Attach the LP caution
label (in the conversion kit bag) to the left side of the unit in
the lower left corner.
17. Replace the front access cover.
2. Mount the wall bracket using the 2 1/4" lag bolts provided.
Make sure the top edge of the bracket is away from the wall.
Ensure the bracket is level when mounted. Extreme care is
needed to ensure the bolts are secured in the center of the
studs.
3. Hang the boiler on the bracket and secure the bottom of the
boiler with two (2) additional lag bolts provided.
Mounting to a metal studded wall:
1. The wall mount bracket is designed for a stud spacing of
16 inches from center. For other stud spacing a solid
mounting surface must be provided by the installer.
ƽ WARNING
The boiler is too heavy for a single person to
lift. A minimum of two people is needed for
mounting the boiler onto the bracket.
2. Mount the wall bracket using two (2) field supplied toggle
bolts capable of supporting 100 pounds each. Ensure the
top edge of the bracket is away from the wall. Ensure the
bracket is level when mounted. Extreme care is needed to
ensure the bolts are secured in the center of the studs.
3. Hang the boiler on the bracket and secure the bottom of the
boiler with two (2) field supplied toggle bolts.
ƽ WARNING
Do not mount the boiler to a hollow wall. Be
sure to mount the boiler to the studs only.
Mounting the boiler
See page 9 of this manual for boiler mounting location
instructions.
NOTICE
The Knight Wall Mount boiler is not
intended for floor installation.
Mounting to a wood studded wall:
1. The wall mount bracket is designed for a stud spacing of
16 inches from center. For other stud spacing a solid
mounting surface must be provided by the installer.
ƽ WARNING
Do not mount the boiler to a hollow wall. Be
sure to mount the boiler to the studs only.
Mounting to a concrete wall:
1. Mount the wall bracket using the two (2) wedge anchor
bolts provided with the bracket. To mount the wedge
anchor bolts, drill a 1/4" diameter hole 1 1/8" deep and
insert anchor. Hang the bracket from the anchor and secure
with the two nuts provided. Make sure the top edge of the
bracket is away from the wall. Ensure bracket is level when
mounted. Extreme care is needed to ensure the bolts are
secured in the center of the studs.
Note: If wall thickness does not allow a 1 1/8" deep hole, field
supplied hardware suitable for the application should be
provided.
2. Hang the boiler on the bracket and secure the bottom of the
boiler with two (2) remaining anchors, following the
instructions above.
ƽ WARNING
The boiler is too heavy for a single person to
lift. A minimum of two people is needed for
mounting the boiler onto the bracket.
ƽ WARNING
After converting to LP, check combustion per
the Start-up procedure in Section 10 of this
manual. Failure to check and verify
combustion could result in severe personal
injury, death, or substantial property
damage.
ƽ WARNING
The boiler is too heavy for a single person to
lift. A minimum of two people is needed for
mounting the boiler onto the bracket.