14
NOTE: DIAGRAMS & ILLUSTRATIONS ARE NOT TO SCALE.
TO TURN OFF GAS TO APPLIANCE
(Refer to controls shown in Figure 16)
1. Turn off the "ON/OFF" rocker switch and/or thermostat (if
installed) to its lowest setting.
2. Turn off electric power to the appliance if service is to be
performed.
3. Push in gas control knob slightly and turn clockwise
to "OFF." Do not force.
This appliance needs fresh air for safe operation and
must be installed so there are provisions for adequate
combustion and ventilation air.
WARNING: Improper installation, adjustment, alteration,
service, or maintenance can cause injury or property dam-
age. For assistance or additional information, consult a
qualified installer, service agency, or your gas supplier.
Operation of this appliance when not connected to a prop-
erly installed and maintained venting system can result in
carbon monoxide (CO) poisoning and possible death.
SHUTDOWN PROCEDURE
To turn off the burner, turn the rocker switch to "OFF" or
adjust the thermostat (if installed) to a setting below room
temperature. The pilot will remain lit for future burner igni
-
tion. For complete shutdown, see "TO TURN OFF GAS TO
APPLIANCE" above.
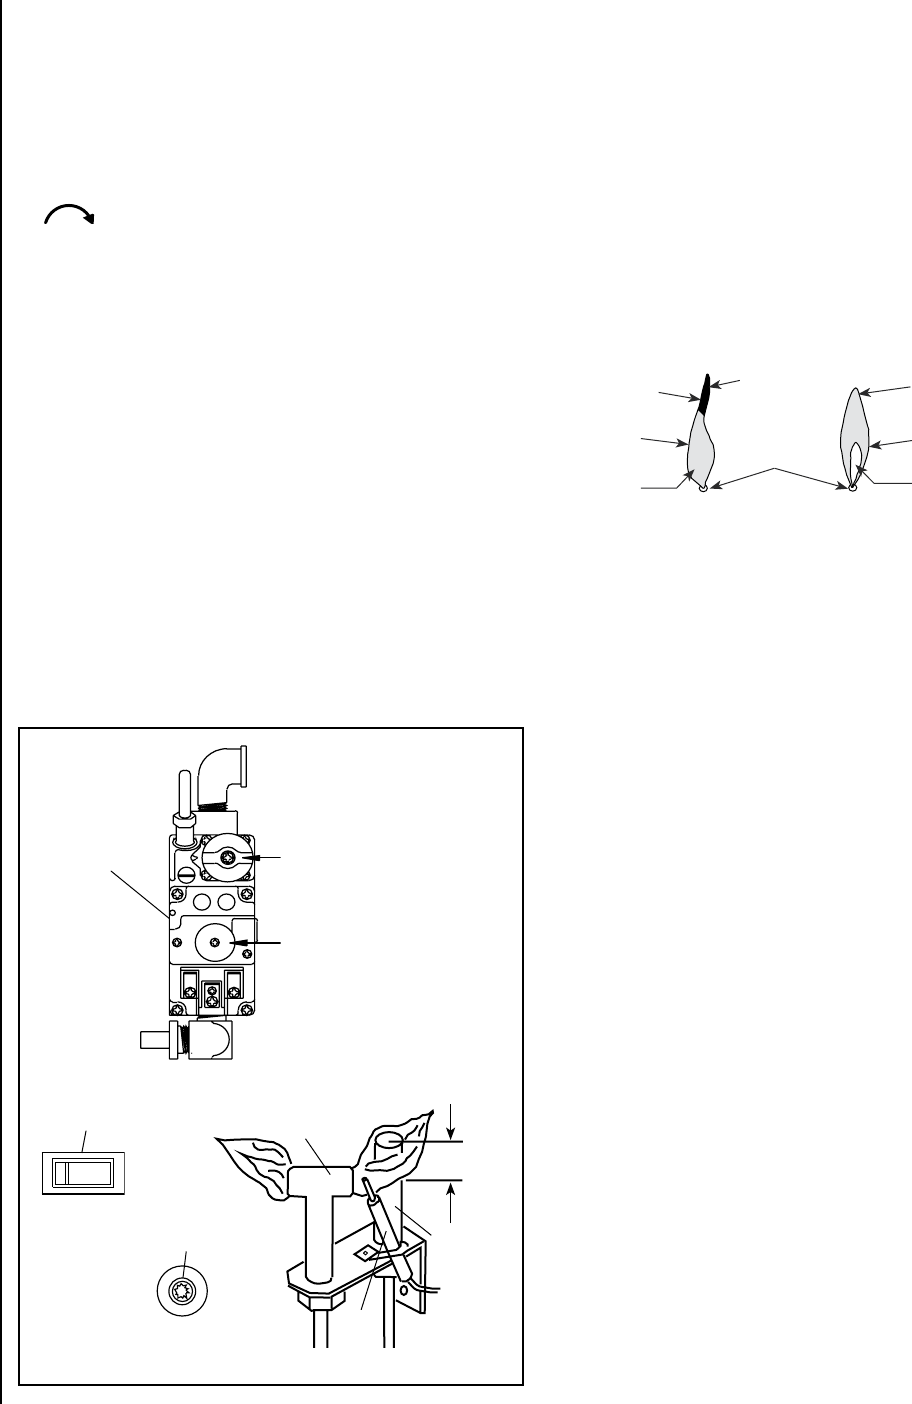
flame Color & behavior
Your Firestar™ gas insert is designed for maximum heating
efficiency. Therefore, upon lighting of the main burner the
flames will be semi-transparent or “bluish.” After 10-20
minutes of operation the logs will heat up and the flames
will become a yellow/orange color.
Adjusting the insert to cause the flames to turn orange
sooner may result in poor combustion, sooting, and a
hazardous situation. See Figure 17 showing proper flame
appearance.
Piezo Igniter
ON/OFF Switch
No Blue Flame
Center
Soot at
Flame Tip
Dark Orange
Flame
IMPROPERLY
BURNING FLAME
Soot above
Flame Tip
No Soot at
Flame Tip
PROPERLY
BURNING FLAME
Semi-Transparent
Yellow Flame
Blue Flame
Center
Ports on Pan
Burner Assembly
Burner Flame Appearance
Figure 16
Figure 17
replaCing burner orifiCes
To change orifices, first remove the cassette (see Fuel Con-
version and Cassette Installation on page 19). Then unscrew
orifice using an 3/4” open end wrench, discard the old orifice
and reinstall the new orifice.
REDUCING THE ORIFICE SIZE FOR HIGHER ALTITUDES
MAINTAINS THE PROPER BTU INPUT TO AIR RATIO. TOO
LARGE AN ORIFICE WILL RESULT IN HIGHER BTU INPUTS
THAN THE DESIGN ALLOWS, MAY RESULT IN AN UNSAFE
CONDITION AND MAY VOID YOUR WARRANTY.
For altitudes above 2,000 ft. (610M) the appliance should be
derated by four (4%) percent every 1,000 ft. (305M).
To operate safely, your Firestar gas insert must have the
proper burner orifice size determined by the altitude at
which it will be operated and other variables such as pres
-
sure and valve tolerances. If you have reason to believe
your insert’s orifice size may be incorrect for your altitude,
have it checked and remedied (if necessary) by a qualified
service technician.
Off/On/Pilot
Flame Height
Adjustment
LO
HI
Gas Control
Knob Off/On/Pilot
Flame Height
Control Knob
(Hi/Lo)
Robertshaw
Gas Valve
Millivolt Pilot
Thermopile
Igniter
Gas Pilot Hood
3/8” to
1/2”


