


13
Operating Instructions
pre-lighting CheCklist
Be sure to check these items before the initial lighting of
the insert:
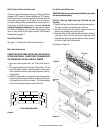
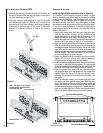
- All packaging materials are removed from the firebox;
brick panels and logs are installed.
- The insert gas label must correspond to the gas supply
available, that is “natural gas” for natural gas; "LP gas"
for LP gas.
- Be sure the gas pressure has been carefully checked (see
Gas Pressure Requirements).
- Fingerprints or other marks are cleaned (while the insert
is cool) from any gold or nickel surfaces with denatured
alcohol and a soft cloth. Marks left on these surfaces
may become etched into the finish if not removed prior
to burning the unit.
- Check all gas fittings for leaks.
- Remove all combustible materials from the area in front
of the insert and ensure the vented areas of the insert face
are unobstructed.
- Check to ensure all clearances to combustibles are met-
see page 7.
- Make sure the glass door is in place and properly sealed
before burning the appliance
- Ventilate the house to clear initial paint curing odors, see
page 15.
Lighting Instructions
The following is a copy of the operating and lighting instruc-
tions found with each insert:
FOR YOUR SAFETY READ BEFORE OPERATING
WARNING: IF YOU DO NOT FOLLOW THESE INSTRUCTIONS
EXACTLY, A FIRE OR EXPLOSION MAY RESULT CAUSING
PROPERTY DAMAGE, INJURY, OR LOSS OF LIFE.
CAUTION: HOT WHILE IN OPERATION. DO NOT TOUCH. KEEP
CHILDREN, FURNITURE, GASOLINE, AND OTHER LIQUIDS
WITH FLAMMABLE VAPORS AWAY. NEVER OPERATE UNIT
WITH GLASS OFF OR ATTEMPT TO REMOVE THE GLASS
WHILE HOT.
A. This appliance is equipped with a piezo ignition device
to light the pilot. When lighting the pilot, follow these
instructions exactly.
B. BEFORE LIGHTING, smell around the appliance area for
gas. Be sure to smell next to the floor, because some gas
is heavier than air and will settle on the floor.
WHAT TO DO IF YOU SMELL GAS:
DO NOT try to light the appliance.
DO NOT touch any electric switch,
DO NOT use any phone in the building. Immediately call
your gas supplier from a neighbor's phone. Follow the gas
supplier's instructions. If you cannot reach your gas supplier,
call the fire department.
C. Use only your hand to push in or turn the gas control
knob. Never use any tool. If the knob will not push in or
turn by hand, don't try to repair it, call a qualified service
technician. Force or attempted repair may result in a fire
or explosion.
D.
DO NOT use this appliance if any part has been under water.
Immediately call a qualified service technician to inspect
the appliance and to replace any part of the control system
and any gas control which has been under water.
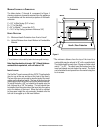
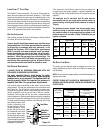
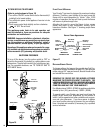
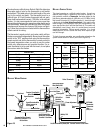
OPERATING INSTRUCTIONS
(Refer to controls shown in Figure 16)
CAUTION: Your Lennox™ gas INSERT MUST ALWAYS BE
OPERATED WITH GLASS IN PLACE.
STOP!! Read the safety information above before pro-
ceeding.
1. Open the lower door. Make sure gas supply shut-off cocks
are open and ON/OFF rocker switch is "OFF." If equipped
with a thermostat, set it to the lowest setting.
2. Turn off all electrical power to the appliance.
3. Push in gas cock dial slightly and turn clockwise to
"OFF."
NOTE: Dial cannot be turned from "PILOT" to "OFF" unless
dial is pushed in slightly. Do not force.
4. Wait five minutes to clear out any gas. Then smell for gas,
including near the floor. If you smell gas, STOP! Follow
"B" above. If you don't smell gas continue.
5. Locate the pilot by looking over the top of the left front
log. A blue flame will be seen when the pilot is lit.
6. Turn the gas control knob counter-clockwise to
the "PILOT" position.
7. Push the knob all the way in and hold in that position.
Immediately light the pilot by pressing the igniter button
several times until pilot is lit. Continue to hold the knob in
for about 30 seconds after the pilot is lit. Release knob and
it will pop back out. Pilot should remain lit. If it goes out,
repeat steps 4-8 holding knob in an additional 15 seconds
after pilot is lit. If knob does not pop out when released,
stop and immediately call your service technician or gas
supplier. If the pilot will not stay lit after several tries,
turn the gas control knob to "OFF" and call your service
technician or your gas supplier.
8. After pilot is lit, turn gas control knob counter-clockwise
to "ON." Knob can only be turned to "ON" if the
knob has popped out.
9. To turn burner on, turn "ON/OFF" rocker switch to "ON"
or set the thermostat to the desired temperature above
room temperature.
10. Adjust the flame height (and heat output) by turning the
flame height knob clockwise for full flame and
counter-clockwise for reduced flame.
11.Turn on the electric power to the appliance and set the
blower to the desired air flow after it turns on when the
appliance reaches operating temperature.