


TROUBLESHOOTING Qualified Technicians Only
PAGE 19
PROBLEM CAUSE(S) SOLUTIONS
1) Pilot will not light, and Piezo Igniter does
not produce a heavy blue spark.
a. Electrode wire (at Piezo Igniter) not
pushed completely on.
b. Piezo igniter is defective
• Make sure connections are solid.
• Replace piezo igniter.
2) Pilot will not light, but Piezo Igniter pro-
duces a heavy blue spark.
a. Incorrect lighting procedure.
b. No gas to appliance due to shut valves or
disconnected gas lines.
• Carefully follow the lighting / operating
instructions found in the appliance of this
owner's manual.
• Check for multiple gas shut-offs; check
gas supply lines.
3) Pilot will not stay lit. a. Thermocouple is not firmly connected to
control valve.
b. Pilot flame is not directed to top of ther-
mocouple.
c. Thermocouple is defective. Make sure
connection is solid.
• Ensure thermocouple is fully inserted into
pilot assembly.
• Replace thermocouple.
4) Pilot flame stays lit, but main burner will
not light.
a. Burner control switch (on control panel) is
in "OFF" position; or thermostat (if in-
stalled) is turned off or temperature set-
ting is too low.
b. Electrical wiring is damaged or poorly
connected
c. One of the following components may be
defective: burner control switch, thermo-
stat, vent spill switch, or thermopile.
• Position the burner control switch to
"ON"; or adjust the thermostat. Refer to
manufacturer's instructions for thermo-
stat.
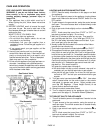
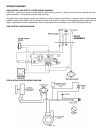
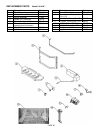
• Refer to Control and Safety Wiring Dia-
gram (page 18) and check electrical
connections.
• Refer to Control and Safety Systems
Wiring Diagram (page 18). Electrically
bypass components one at a time and
replace defective item.
5) Main burner stays lit for up to 10 minutes
and then shuts off, pilot flame remains lit.
a. Vent is blocked; flue gas is "spilling",
which activates the spill switch and shuts
down the appliance.
b. The house is negatively pressurized re-
sulting in spill switch activation.
• Examine venting system for blockage.
Remove any blockage.
• Open a window to see if the problem is
corrected.
6) Smell of gas a. Loose fittings may be allowing gas to leak
out.
• Check all joints for leakage: pilot assem-
bly, gas supply system, main burner as-
sembly, pilot and burner adjustment
screws. Use a proper leak check solu-
tion. WARNING: Never use an open
flame to check for leaks.
7) A thin coating of black soot forms on the
window. NOTE: See page 16, Cleaning
Glass.
a. Burner primary air inlet is restricted or
blocked.
b. Flames make contact with logs or other
surfaces.
c. Improper venting.
• Be sure all openings (fresh air inlets) in
stove are free from dust and debris. Re-
check these areas periodically.
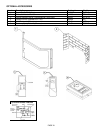
• Make sure ceramic logs are in their cor-
rect positions.
• Check for flue blockage, disconnected
flue, improper installation. Make appro-
priate corrections.
8) A white coating forms on windows, logs,
and / or inside walls of firebox.
a. Residues / impurities being burned off. • Follow cleaning guidelines outlined in the
MAINTENANCE section of this manual.
9) Circulation blower makes a humming
sound, but there is no circulation air.
a. Impeller blades in circulation blower are
dirty.
b. Circulation blower is defective.
• Disconnect electrical power to circulation
blower, access blower and clean impeller
blades as outlined in the MAINTE-
NANCE section of this manual.
• Replace blower.
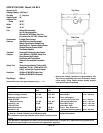
REFERENCE INFORMATION FOR QUALIFIED TECHNICIAN:
Thermopile / Thermocouple Operation
♦ Thermopile: Millivolt production should be a minimum of
325 MV with pilot only.
♦ Thermocouple: Millivolt production should be a minimum of
14 MV with pilot only.
Drop out rate
♦ TP 50-60 MV
♦ TP 1 1/2-2 Min. (3 max.) if longer, replace thermopile.