


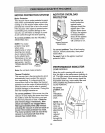
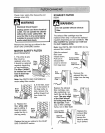
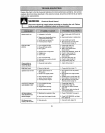

Review this chart to find do.it-yourself solutions for minor performance problems, Any serv}ce
needed, other than those described in this owner's manual, should be performed by an autho-
rized service representative,
...................................................... i i iiiiiii
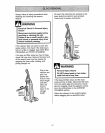
WARNING Electrical Shock Hazard
I
Disconnect electrical supply before servicing or cleaning the unit. Failure
to do so could result in electrical shock or personal injury,
, i iii iii
1. Unplugged at wall outlet 1 Plug in firmly, push On/Off switch to
ON
2, Tripped circuit breaker/blown fuse 2. Reset circuit breaker or replace fuse
Cleaner won't run.
Poor job of dirt 1. Foil or clogged dust bag
_}ck*up. 2 Wrong pile height setting
3_ Worn agffator
7.
8,
9.
Cleaner picks up 1.
moveable rugs or
pushes too hard,
Light won't work,
Agitator does not turin
Performance Indicator,
some models, is red.
Air flow restricted
with attachment use,
Sound changes_
Dirt Sensor, some
models, will not work,
at household service panel
30ntOtf switch not turned ON
4., Thermal protector tripped
; 4 Clogged nozzle Orbag holder
5 Clogged hose
6 Hole In hose
Hose not inserted fully
Motor protection system activated
Dirty fitters,
Wrong pile he{ght setting
1o Burned out light bu}b
t_ Agitator On/Off selector in
OFF pesilion
2 Handle tn fu_l upright positron
3 Hose removed fromnozzle
4 AgitatorOvedoad tripped
5 Thermal protec{or tripped
1, Futlor c$oggeddust bag
2_ Dirty filters
3 Clogged aidlow passage
4, Certainattachmenttools
1. Attachment use restricts air flow
2, New carpet fuzz clogged air path
1o Dirty optic cells
3. Push On/Of! switch to ON
4o Allow vacuum to cool. then reset
Therma_ protector (page 12)
1, Change bag, (page 15)
2, Adjust setting, (page 7)
3, Take to your nearest Sears
Service Center
4. Check CLOG REMOVAL, (page 18)
5. Check Ior clogs, (page t8)
6, Take to your nearest Sears
Service Center
7, Insert hose fully, (page 10)
8, Check for clogs, (page !8)
9, Change fi_ters, (page 16).
I. Adjust setting, (page 7)
I,,Change tight bulb, (page 17)
1. Move selector to the ON posit_on,
(page 8)
2 Move handto from upright position
(page 7)
3 Reattach hose to nozzle (page 10)
4 Reset Agitator Over_oed (page 12)
5 AJlowvacuum to cool, then reset
Thermal protector (page 12).
I. Change bag, (page 15)
2,, Change fiJters,(page 16)
3. Clear clog from airflow passage,
(page 18)
4,, This Is normal Light should go off
when tool is removed
t. Check ATTACHMENTS, (page S)
2, Check CLOG REMOVAL end clean
hose, (page 18),
1. Clean optic cells, (page 13)
19