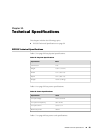
Chapter 10
Reimaging the Appliance
This chapter includes the following topic:
■ Reimaging and Relicensing an Appliance on page 55
Reimaging and Relicensing an Appliance
The appliance comes with software preinstalled. If needed, you can reinstall the
factory image. This process is known as reimaging the appliance. The reimaging
process rewrites the disk except for the partition containing /var/idp. If necessary
and if possible, you should save a copy of data or custom configuration files before
reimaging.
If you reimage the appliance, you must also relicense it.
To reimage the appliance:
1. Connect a PC to the console serial port of the device, using the serial cable
provided with the appliance.
2. Power off the appliance.
3. Insert the USB flash memory stick that shipped with the appliance into the USB
port on the front of the appliance. If you have misplaced your USB flash memory
stick, contact Juniper Networks Technical Assistance Center (JTAC).
4. Power on the appliance.
The appliance boots from the USB stick and runs the reimaging process. Follow
any prompts on the serial console.
5. When the reimaging process has completed, remove the USB stick and reboot.
Next Steps 1. Configure the appliance as if a new installation.
2. Relicense the appliance.
3. Re-add the appliance to NSM.
4. Push updates to detector engine, attack object, and security policy.
Related Topics ■ Performing the Initial Configuration on page 27
■ Installing the Product License Key on page 32
■ Adding a Reachable IDP Device to NSM on page 41
Reimaging and Relicensing an Appliance ■ 55


