


3. Push a security policy update job to update attack objects in use in your security
policy:
a. In NSM, select Devices > Configuration > Update Device Config.
b. Select devices to which to push the updates and set update job options.
c. Click OK.
Related Topics ■ Upgrading Software (CLI Procedure) on page 51
Upgrading Software (CLI Procedure)
To upgrade IDP software from the CLI:
1. Download the software image to a host that runs an FTP server. Follow these
steps:
a.
Go to https://www.juniper.net/customers/csc/software/ and log in with your
customer username and password.
b. Navigate to IDP > ScreenOS Software Downloads (including NSM/Global
Pro, STRM, IDP and NetScreen-Remote). In the row for IDP, click 5.0.
c. Save the sensor_version.sh file (where version is the number that identifies
the software release version).
2. Connect to the IDP command-line interface in one of the following ways:
■ Use SSH to connect to the IP address or hostname for the management
interface. Log in as admin and enter su - to switch to root.
■ If you prefer, make a connection through the serial port and log in as root.
NOTE: To make an SSH connection, you must have enabled SSH for the management
port (eth0). For details, see the ACM online Help.
3. Use SCP or FTP to copy the license file to the IDP appliance. The IDP appliance
does not run an FTP server, so you have to initiate the FTP session from the IDP
appliance.
4.
Run the upgrade script by entering sh sensor_version.sh, where version is the
number that identifies the software release version. When the script has finished,
enter reboot.
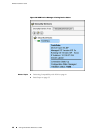
5. In the NSM Device Manager, right-click the device, select Adjust OS Version,
and complete the wizard steps.
6. In the NSM Device Manager, right-click the IDP device and select Import Device.
The software upgrade is complete.
Upgrading Software (CLI Procedure) ■ 51
Chapter 8: Upgrading Software