


898841-UIM-B-0113
Johnson Controls Unitary Products 11
RIGHT OR RIGHT REAR PIPING
For Right Side Utility Bundle Exit - Cut out the corner of the right/left
plastic cabinet with a hacksaw or similar tool. See Figure 15.
1. Put the refrigerant piping and the drain hose together. Position
them to the left side and then firmly apply piping tape from the end.
2. Insert the drain hose into field-provided PVC sleeve and hook the
upper part of the indoor unit on the wall mounting bracket.
3. Check if the indoor unit is hooked securely on the wall mounting
bracket by trying to move the unit left and right.
4. Thrust the lower part of the indoor unit into the wall mounting
bracket.
LEFT OR LEFT REAR PIPING
For Left Side Utility Bundle Exit - Cut out the corner of the right/left
plastic cabinet with a hacksaw or similar tool.
Make sure you reattach the drain hose and the drain cap in case of left
or left rear piping. Otherwise, it could cause drops of water to drip from
the drain hose.
1. Put the refrigerant piping and the drain hose together then firmly
apply felt tape from the end.
2. Pull out the drain cap at the rear right of the indoor unit.
3. Pull out the drain hose at the rear left of the indoor unit.
4. Put the drain cap into the section to which the drain hose is to be
attached at the rear of the indoor unit.
5. Insert the drain hose fully into the drain pan at the rear right of the
indoor unit.
6. Insert the drain hose into field-provided PVC sleeve and hook the
upper part of the indoor unit on the wall mounting bracket.
REAR OR DOWNWARD PIPING
1. Put the refrigerant piping and the drain hose together then firmly
apply felt tape from the end. Use bandage stopper at the end of felt
tape.
2. Insert the drain hose into field-provided PVC sleeve and hook the
upper part of the indoor unit on the wall mounting bracket.
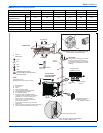
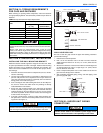
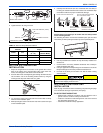
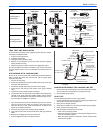
FIGURE 14: Proper and Improper Drain Piping
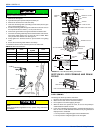
FIGURE 15: Left or Right Side Exits
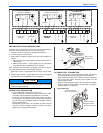
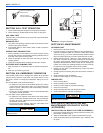
FIGURE 16: Right or Right Rear Piping
SLIT
RIGHT
PIPING
BOTTOM
PIPING
BIND WITH VINYLTAPE
PIPE (TOP) REAR PIPING
INDOOR UNIT
DRAIN HOSE (BOTTOM)
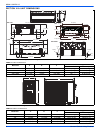
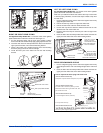
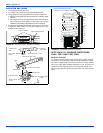
FIGURE 17: Left or Left Rear Piping
INDOOR UNIT
DRAIN HOSE
DRAIN CAP
FOR LEFT OUTLET
PIPING, CUT OFF
THE PIPING OUTLET
CUTTING GROOVE
WITHA HACKSAW
REMOVE DRAIN
CAP BY PULLING
ATTHE PROJECTION
ATTHE END OF THE
CAP WITH PLIERS, ETC.
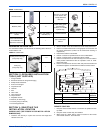
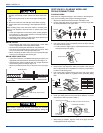
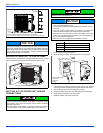
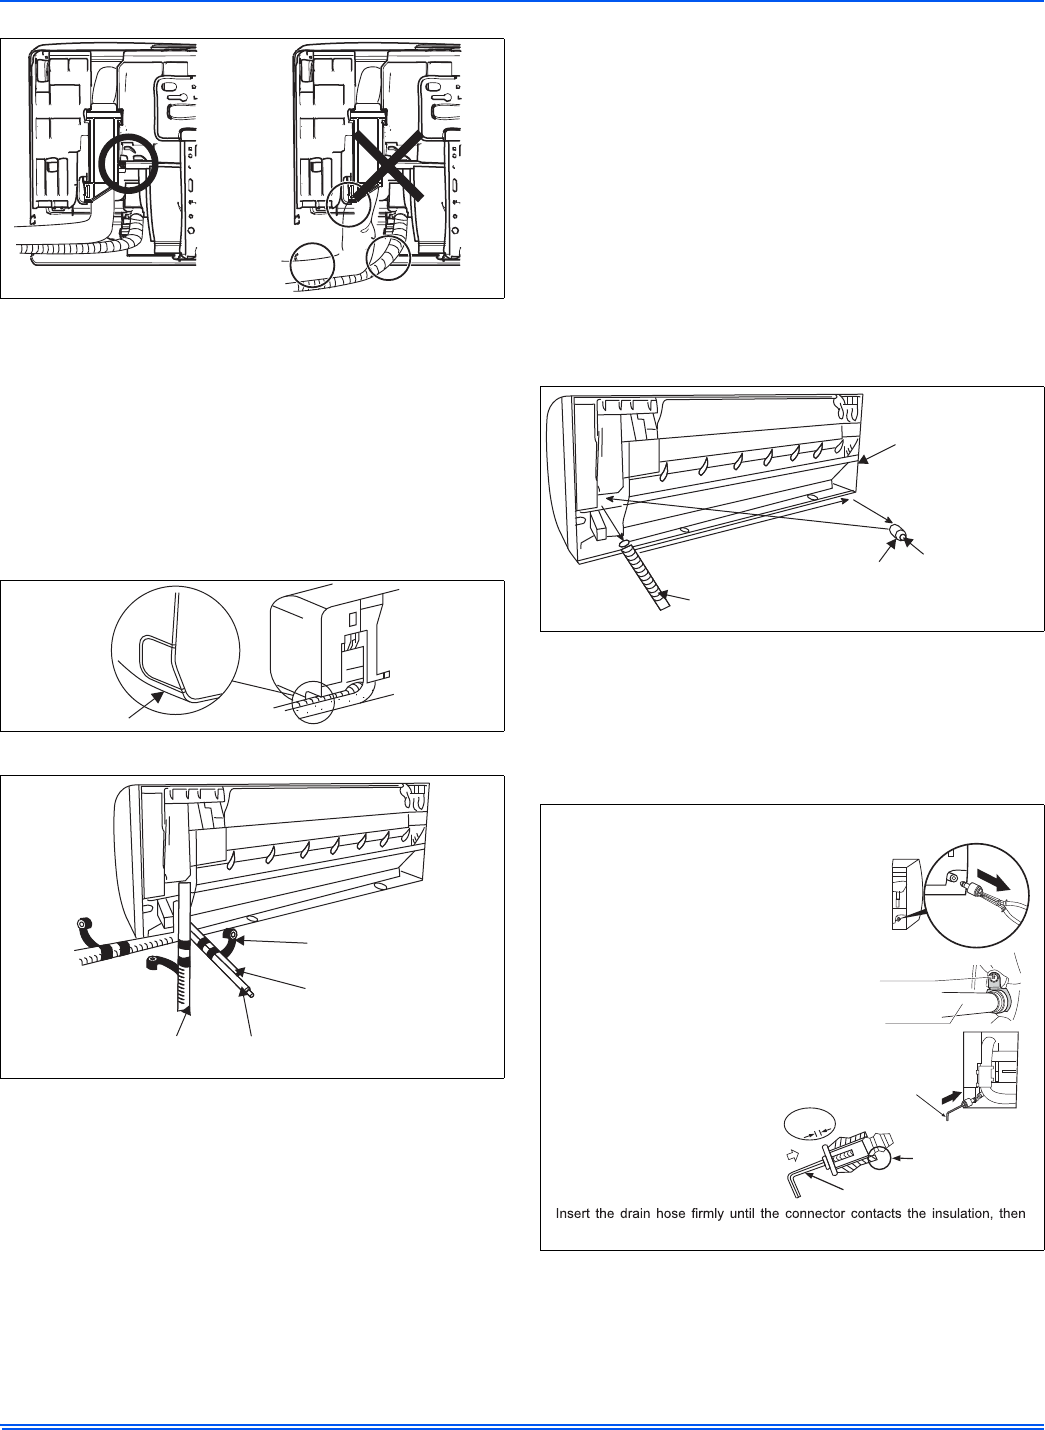
How to replace the drain plug and drain hose
• How to remove the drain cap
Clamp drain cap with needle-nose pliers, and pull out.
• How to remove the drain hose
The drain hose is secured in place by a screw.
Remove the screw securing the drain hose, then
pull out the drain hose.
• How to attach the drain cap
1. Insert hexagonal wrench (0.16inch).
2. Firmly insert drain cap.
• How to attach the drain hose
secure it in place using the original screw.
Do not apply lubricating oil
(refrigerant machine oil) when
inserting the drain cap. If applied
deterioration and leakage of the
drain plug may occur.
Insert a hexagon wrench
(4 mm)
No gap
Drain Hose
0.16”
Insulation
fixing screw