11 60-2285—7
R4795A
OPERATION • TROUBLESHOOTING
Operation
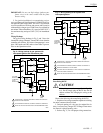
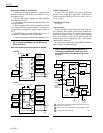
NORMAL OPERATION (REFER TO FIG. 2 AND 3.)
Call for Heat (Limit Switch
Closed)
Terminal 1 energized. Relay 3K pulls in to close contact 3K2 and energize
terminal 8 fan or burner motor.
Airflow Proved Low voltage airflow switch between terminals 6 and 7 closes to energize the
purge timer.
Prepurge Complete (7, 10, 30, 60,
or 90 Seconds)
Relay 1K pulls in to close contact 1K4 and energize terminal 3 (pilot valve, first
stage oil valve(s), or expanding pilot valve) directly and terminal 4 (ignition)
through the closed flame relay contact 2K2. Contact 1K1 closes to energize the
safety switch heater.
Flame Proven (Pilot or First Stage
Oil)
R4795A: Relay 2K pulls in. Contact 2K2 opens to cut off ignition, contact 2K3
closes to energize the main fuel valve(s) or second stage oil valve(s). Contact
2K1 opens to de-energize the safety switch heater and reset the purge timer.
Controller Satisfied All relays drop out; systems shuts down.
SAFETY OPERATION
Flame Failure R4795A: Relays 1K and 2K drop out. Contact 1K4 opens to de-energize
terminals 3, 4, and 5. If air is still proven, the prepurge period begins. After
prepurge, one attempt is made to start the burner.
Airflow Failure If airflow fails at any time during the operating cycle, relay 1K drops out.
Contact 1K4 opens to de-energize terminals 3, 4, and 5. Only terminal 8, fan or
burner motor, remains powered. If air is re-established, the prepurge period
starts and the startup sequence is repeated.
Prepurge Timer Failure If the plug-in purge timer is not properly seated, or is not functioning properly,
the fan motor will start on a call for heat, but the 1K relay will not pull in. The
result will be a continuous purge (safe failure).
Hot Refractory Hold-in (Photocell
Installations)
If hot refractory holds in the flame relay at the end of the running cycle, startup
is prevented until the hot refractory no longer holds in the flame relay.
Troubleshooting
The first step in troubleshooting the R4795A is to deter-
mine the location of the system trouble. Reset the safety
switch and operate the system on a normal start. Refer to the
Normal Operation subsection in the Operation section. Ob-
serve the operation carefully to determine at what point the
trouble occurs. Then refer to the Trouble List in the Trouble
List section and follow the troubleshooting procedure.
IMPORTANT: At the completion of any troubleshooting
procedure, be sure to perform the Checkout Tests
listed in the Checkout section.
PRELIMINARY INSPECTION
1. Disconnect power to the R4795 by opening the sys-
tem disconnect switch.
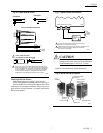
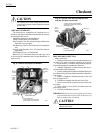
2. Remove the R4795 cover. Make sure all mounting
screws are tight, and that the plug-in amplifier and purge
timer are properly seated; refer to Fig. 10.
3. Reset the safety switch (push in and then release the
small round button that extends through the plastic safety
switch cover; see Fig. 9).
TROUBLE LIST
Compare the following list of troubles with the actual
deviations from normal operating sequence. Select the appli-
cable letter(s) and proceed to the corresponding Trouble-
shooting Procedure(s).
A. Relay 3K does not pull in on a call for heat.
B. Relay 3K pulls in but the burner motor does not start.
C. Burner motor starts but prepurge does not stop at end
of purge timing (relay 1K does not pull in).
D. Relay 1K pulls in but the pilot does not light, ignition
does not occur, or expanding pilot valve does not
open.
E. Pilot lights but relay 2K does not pull in (control locks
out without lighting the main burner).


