


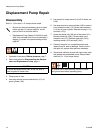
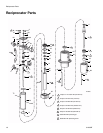
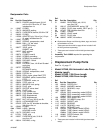

Reciprocator Repair
14 312350E
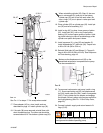
10. Clean all sealant from threads of any part you are
reusing. Apply Loctite
®
242 or Perma-Loc
®
115
thread sealant to first two or three internal threads of
valve assembly (31).
If you removed capscrew (51) apply thread sealant
to first two or three internal threads of valve stop
(26). Apply primer to external threads of valve
sleeve (29). Let dry for three or four minutes.
Assemble. Remove excess sealant.
11. Remove o-ring (13*) from bottom of spool valve (31)
and replace it with a new o-ring.
12. Use a spanner wrench to screw piston (22) onto
displacement rod (34). Torque to 40 to 48 ft-lb (54 to
65 N.m).
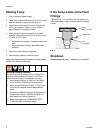
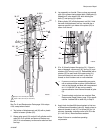
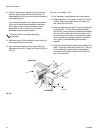
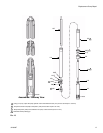
See F
IG. 10 for steps 13-16.
13. Lay Assembly A and Assembly B on work bench.
14. Slide Assembly B in into center of tool (D), Part No.
189305. Align upper detent holes (C) of yoke (9)
with center line of tool (D).
15. Insert spring (6) and one ball (7) into valve stop (26)
of Assembly A. Tilt valve stop and start guiding it
into tool (D), making sure ball is sliding into rounded
slot in tool (D). Place other ball at the other end of
spring and push it in with your thumb while rotating
valve stop (26) until spring is horizontal and balls
are in place. Continue holding this assembly
together.
16. Slide valve stop assembly down into tool. Make sure
balls (7) snap into upper set of holes (C) in yoke (9)
and curved ends of guide clamp have engaged
valve sleeve (29) groove. Slide tool (D) back over
rod (12) to remove it.
F
IG. 10
Allow 24 hours to cure before operating
reciprocator.
9
ti10606a
12
D
C
7
6
Assembly A
Assembly B
31
26
51
29