


Reciprocator Repair
12 312350E
Reciprocator Repair
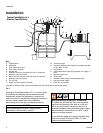
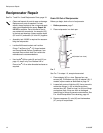
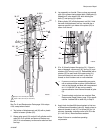
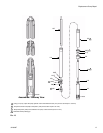
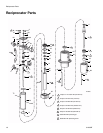
See FIG. 7 and FIG. 9 and Reciprocator Parts, page 18.
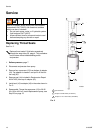
Drain Oil Out of Reciprocator
Before you begin, drain oil out of reciprocator.
1. Relieve pressure, page 7.
2. Place reciprocator in a drain pan.
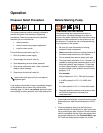
F
IG. 7
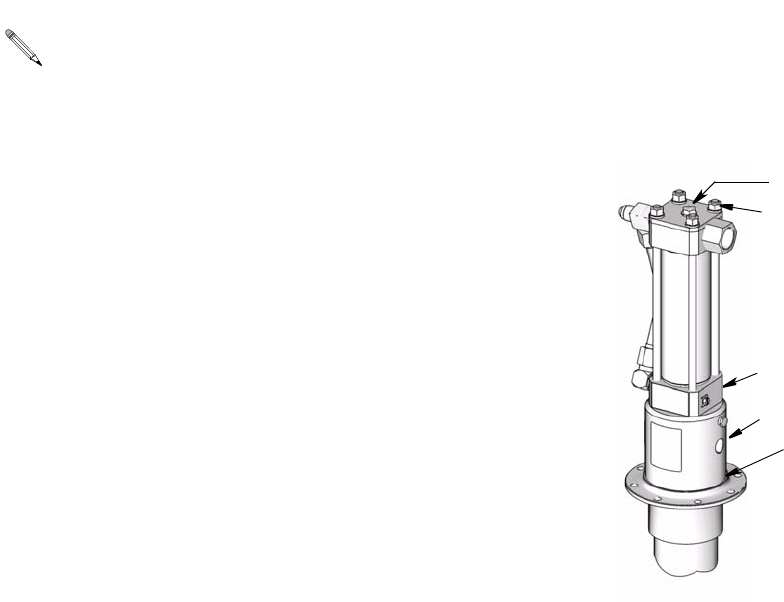
See F
IG. 7 for steps 1-3, except where noted.
1. Place adapter (43) in a vise. Remove four cap-
screws (46). Pull bottom cap (32) off adapter (43). If
needed, replace seals as described on page 10.
2. Loosen both nuts on fluid tube (45). Use a wrench to
rotate tube fittings (1, 60) to the side and then
remove tube (45). Check o-rings (1a, 60a) on fittings
and replace them if they are worn or damaged.
Install plugs in fittings to prevent contamination. See
F
IG. 4 and Reciprocator Parts drawing, page 18.
3. Remove capscrew (3), nuts (36) and lockwashers
(37) on top of reciprocator.
• Clean and inspect all parts for wear or damage.
Replace worn parts as needed. For best
results, always replace all the o-rings and seals
when you disassemble the pump. Repair Kit
247455 is available. Parts included in the kit
are marked with an asterisk, for example (23*),
in the text and drawings. Always replace seals
(23* and 24*) and seals (16* and 44*) together.
• Assembly tool 189305 is required for reassem-
bling the reciprocator.
•Loctite
®
242 thread sealant and Loctite
®
Primer T or Perma-Loc
®
115 thread sealant
and Perma-Bond
®
Surface Conditioner I are
required. Be sure their shelf life is within the
manufacturer’s recommendations.
• Use Loctite
®
609 on yoke (9) and rod (12) on
page 13, step 9 only. Use Loctite
®
242 or
Perma-Loc
®
115 on other threaded surfaces as
required.
3, 39, 2
36, 37
32
43
46
(hidden from view)
ti10602a