


13
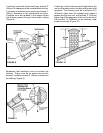
When a metal prefabricated chim-
ney is used, the manufacturers in-
stallation instructions must be fol-
lowed precisely. You must also pur-
chase (from the same manufac-
turer) and install the ceiling support
package or wall pass-through and
T section package, firestops
(where needed), insulation shield,
roof flashing, chimney cap, etc.
Maintain the proper clearance to the
structure as recommended by the
manufacturer. This clearance is usu-
ally a minimum of 2" (50mm), al-
though it may vary by manufacturer
or for certain components.
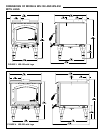
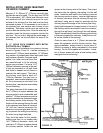
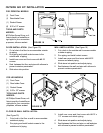
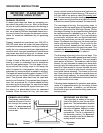
There are basically two methods of
metal chimney installation. One
method is to install the chimney in-
side the residence through the ceil-
ing and the roof (Figure 15). The
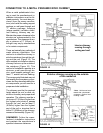
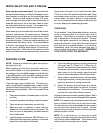
other method is to install an exterior
chimney that runs up the outside of
the residence (Figure 16). This
method of installation requires at a
minimum a wall pass-through de-
vice, a wall support package, insu-
lated T section and roof flashing.
The components illustrated may not
look exactly like the system you pur-
chase, but they demonstrate the ba-
sic components you will need for a
proper and safe installation.
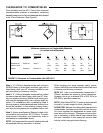
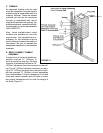
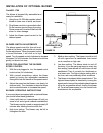
The chimney must be the required
height above the roof or other ob-
struction for safety and proper draft
operation. The chimney must be a
minimum of 3' (914mm) higher than
the highest point where it passes
through the roof, and at least 2'
(610mm) higher than the highest
part of the roof or structure that is
within 10' (3048mm) of the chimney,
measured horizontally (Figure 10).
REMEMBER: Follow the manu-
facturers installation instructions
and maintain the manufacturers
specified clearance distances.
FIGURE 15
FIGURE 16
Interior chimney
running through
ceiling and roof
Exterior chimney running up the outside
of the residence
*Note: Unit has not been
tested with a horizontal
connector. Refer to local
building codes.
CONNECTION TO A METAL PREFABRICATED CHIMNEY