


11
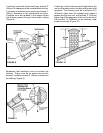
Minimum 3 ½" (89mm) [4" (102mm) nominal] thick
solid bricks are to be used. The fire clay liner (ASTM
C35 or equivalent), 5/8" (16mm) wall thickness, must
not penetrate into the chimney beyond the inner
surface of the chimney flue liner and must be firmly
cemented in place. If it is necessary to cut a hole in
the chimney liner, use extreme care to keep it from
shattering. Refractory mortar must be used at the
junction with the chimney liner. After the assembly is
complete, insert the chimney connector into the fire
clay liner. Do not push it beyond the inside edge of
the chimney liner, as this will affect the draw of the
chimney.
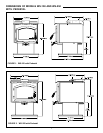
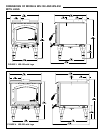
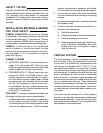
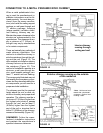
B. 6" SOLID PACK CHIMNEY WITH METAL
SUPPORTS AS A THIMBLE:
For the method of installation to a masonry chimney
shown in Figures 13 and 14 , it will be necessary to
purchase a 6" (152mm) inside diameter, 12" (305mm)
long section of prefabricated listed solid pack chim-
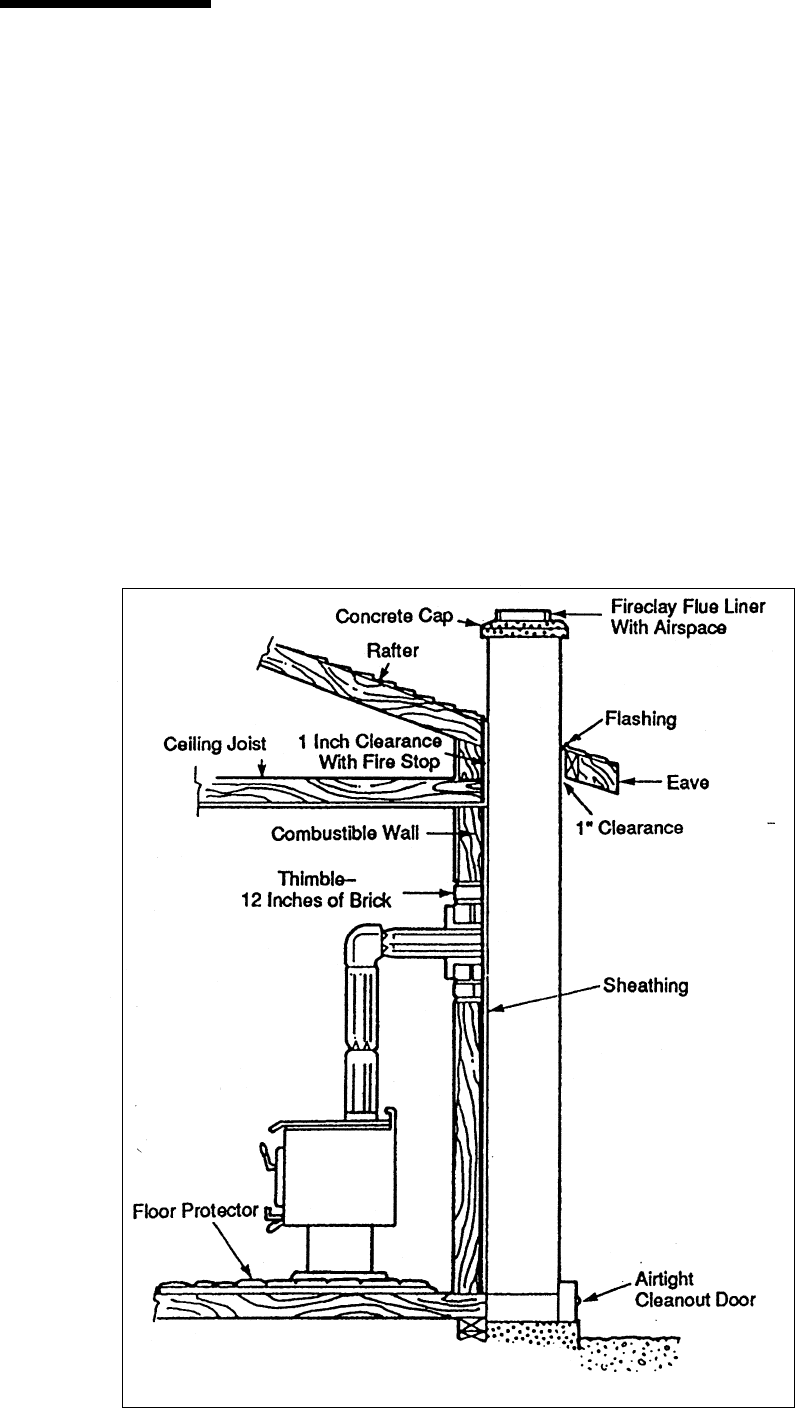
INSTALLATION USING MASONRY
OR BRICK CHIMNEY
FIGURE 12
ney to use as a thimble. Purchase a wall
spacer, trim collar and wall band that
are manufactured to fit the chimney
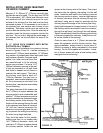
section you purchase. Cut out a 14 ½"
(368mm) diameter opening in the wall.
It may be necessary to cut wall studs
and install a header and sill frame to
maintain the wall support. The hole in
the chimney must have at least a 6"
(152mm) diameter fire clay liner or
equivalent, secured with refractory mor-
tar. If it is necessary to cut a hole in the
chimney liner, use extreme care to keep
it from shattering.
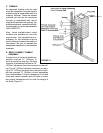
The safety features of this system are
the 2" (50mm) air space between the
chimney section and combustible wall
and the 1" (25mm) air space around the
chimney connector as it passes through
the chimney section to the chimney. The
location of the opening through the wall
to the chimney must leave a minimum
18" (457mm) vertical clearance be-
tween the connector pipe and the ceil-
ing, to prevent the ceiling from catching
fire when using single wall pipe.
First, build the frame for the thimble,
making sure that it is no smaller than
14½" (368mm) diameter, which will
maintain a 2" (50mm) air space around
the chimney section. Attach the wall
spacer to the chimney side of the frame. Then insert
the frame into the opening, toe-nailing it to the wall
studs. Install the wall band in the framing to secure
the chimney section in place. Insert a single section
of chimney connector into the chimney through the
wall band, being sure it does not protrude into the
chimney beyond the edge of the chimney flue lining.
Apply high temperature furnace cement to the end of
the chimney section and install it over the connector,
through the wall band, and through the wall spacer.
Tighten the wall band to hold the chimney section firmly
in place and against the chimney. Install the trim col-
lar on the outside of the opening.
Check to insure there is a 1" (25mm) air space be-
tween the connector and the chimney section. Also,
during installation, always check to insure that a 2"
(50mm) air space is being maintained to the wood
framing. Do not fill this space with insulation. Insula-
tion in this air space will cause a heat buildup which
may ignite the wood framing.