


Heat & Glo LifeStyle Collection • Twilight-II • 2087-900 Rev. G • 12/0510
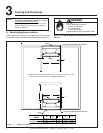
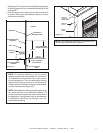
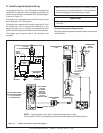
The diagram shows how to properly position, level, and se-
cure the appliance (see Figure 5.2). Nailing tabs are provid-
ed to secure the appliance to the framing members.
• Place the appliance into position.
• Level the appliance from side to side and front to back.
• Shim the appliance with non-combustible material, such
as sheet metal, as necessary.
• Bend out nailing tabs on each side.
• Keep nailing tabs flush with the framing.
• Secure the appliance to the framing by using nails or
screws through the nailing tabs.
Figure 5.2 Proper Positioning, Leveling and
Securing of a Appliance
Fire Risk.
• Prevent contact with sagging, loose
insulation.
• Do NOT install against vapor barriers or
exposed insulation.
WARNING
Do NOT notch into the framing around the appliance spacers.
CAUTION
A. Securing and Leveling the Appliance
Appliance Preparation
5
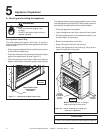
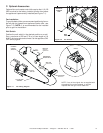
Figure 5.1 Positioning the Metal Hearth Strip
Placing Metal Hearth Strip
The metal hearth strip (approx. 46 inches x 4 inches) is
used to provide added protection where appliance and outer
structure meet.
• Place a generous bead of silicone caulk into the corner
of the protective hearth strip.
• Place the metal strip onto the structure where the outer
edge of the appliance will sit (see Figure 5.1).
• Place the appliance into position. Make sure flashing
edges on the outdoor surround fit up tight to the framing.
METAL HEARTH STRIP
UNDER EDGE OF
APPLIANCE
SECURE
TO FRAMING
IN A MINIMUM
3 PLACES
PER SIDE
SECURE TO
FRAMING
NOTE: Caulk behind all flanges
before securing to the exterior.
APPLIANCE
EXTERIOR
APPLIANCE
EXTERIOR