


21
Heat & Glo • PALOMA-BZ-MOD, PALOMA-GR-MOD, PALOMA-GY-MOD • 2189-900 Rev. i • 5/12
Figure 5.22
Figure 5.23
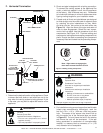
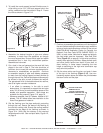
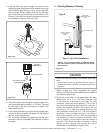
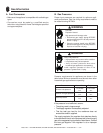
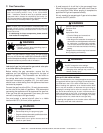
4. Pass the flex pipe down through the center of the
chimney system, and center the top adapter on the top
of the chimney pipe. Drill four 1/8 in. (3 mm) diameter
holes through the top adapter, and into the chimney
top. Ensure that you are drilling into the metal on the
chimney. Twist lock the high wind termination cap onto
the top adapter (Figures 5.22 and 5.23).
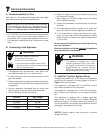
5. Pull the flex pipe down through the ceiling support box,
until it protrudes approximately 3 in. (76 mm). Connect
the flex pipe to the retro connector, and attach with
sheet metal screws.
6. Push the flex pipe back up into the ceiling support box,
center the retro connector, and attach it to the support
box with sheet metal screws.
7. The connection between the appliance and the retro
connector may be completed with sections of direct
vent pipe.
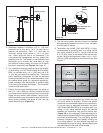
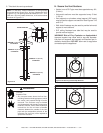
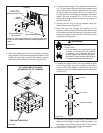
L. Existing Masonry Chimney
SHOWING TWO 30 FT.
(9 M) SECTIONS OF
FLEX LINER
PIPE LENGTH
(OPTIONAL)
CO-AXIAL TO CO-LINEAR
CONNECTOR PART
#923GCL
CHIMNEY LINER
TERMINATION CAP PART
#923GK
3 IN. (76 MM) FLEX LINER
Type A
Type C - Up & Out Installation
Figure 5.24
*NOTE: In the Commonwealth of Massachusetts,
the word damper shall be replaced with the words
fl ue restrictor.
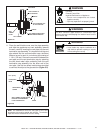
SHEET METAL SCREWS
HIGH WIND
TERMINATION CAP
DRILL FOUR 1/8 IN. (3 MM)
DIAMETER HOLES
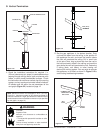
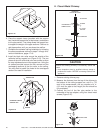
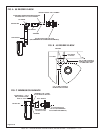
1. Before cutting any holes, assemble the desired
sections of direct vent pipe to determine the center of
the masonry penetration.
2. Once the center point of the penetration has been
determined, cut a 6 in. (152 mm) diameter hole
in the masonry. If the hole is too large, the retro
connector might not mount properly; if the hole is
too small, the appliance might starve for intake air. If
there is a frame wall in front of the masonry wall, cut
and frame a 10 in. (254 mm) square opening in the
wall (centered around the 6 in. (152 mm) masonry
opening). If there is sheet rock only (no studs) in
front of the masonry the 10 in. (254 mm) opening is
still needed, but does not need to be framed. If the
hole is framed a round support box/wall thimble is
required. This allows the retro connector to mount
directly on the masonry and provide the correct
clearances to combustibles (Figure 5.25).
Ensure that existing chimney is functionally sound and
clean.
• Have inspection done by qualifi ed chimney sweep or
professional installer BEFORE converting to direct vent
appliance.
CAUTION