


Hearth & Home Technologies • 6100PLUS • 4041-127 Rev D • 09/05 29
Although the frequency of appliance servicing and maintenance will depend on use and the type of installation, a qualifi ed
service technician should perform an appliance check-up at the beginning of each heating season.
Fire Risk
Explosion Risk
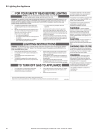
Inspect external vent cap regularly.
• Ensure no debris blocks cap.
• Combustible materials blocking cap may
ignite.
• Restricted air flow affects burner
operation.
WARNING
Annual inspection by qualified technician
recommended.
Check:
• Condition of doors, surrounds and fronts.
• Condition of glass, glass assembly and glass
seal.
• Obstructions of combustion and ventilation
air.
• Condition of logs.
• Condition of fi rebox.
• Burner ignition and operation.
• Burner air shutter adjustment.
• Gas connections and fi ttings.
• Obstructions of termination cap.
Clean:
• Glass.
• Air passageways, grilles, control
compartment.
• Burner, burner ports.
Risk of:
• Fire
• Delayed ignition or explosion
• Exposure to combustion fumes
• Odors
WARNING
13
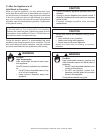
Maintaining and Servicing the Appliance
Risk of injury or property damage
Before servicing:
• Turn off gas.
• Turn off electricity to appliance.
• Disable remote control, if one is present.
• Ensure appliance is completely cooled.
After Servicing:
• Replace any screen or barrier that was removed.
• Reseal and reinstall any venting removed for
servicing.
WARNING
C. HRV200PLUS
Please refer to the HRV200PLUS manual for additional
maintenance requirements for the ventilation portion of the
6100PLUS.
A. Annual Maintenance
To ensure that your gas appliance operates in a safe and
effi cient manner, it needs to be inspected at least on an an-
nual basis by a qualifi ed fi eld service person. Like any gas
appliance, This gas appliance must be tuned up to ensure
optimum performance.
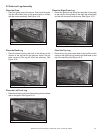
B. Cleaning the Burner and Control Compartment
Keep the burner and control compartment clean by brushing
and vacuuming at least once a year. Always turn the wall (or
dashboard switch) and the gas valve off before cleaning.
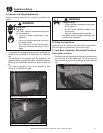
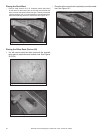
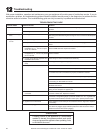
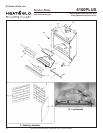
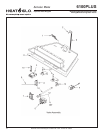
D. Ember Bed Bulb Replacement
• Remove two screws from dash plate holding each
bulb bracket.
• Pull socket down and forward to access bulb, replace the
bulb and return to installed position. See Figure 13.1.
Note: After extended periods of burning, fi lm may build up
on the fl ame sensor. The fl ame sensor should be cleaned
annually with emery cloth to remove this build up.
Figure 13.1 Bulb Replacement