


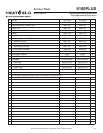

28 Hearth & Home Technologies • 6100PLUS • 4041-127 Rev D • 09/05
With proper installation, operation and maintenance your gas appliance will provide years of trouble-free service. If you do
experience a problem, this troubleshooting guide will assist a qualifi ed service person in the diagnosis of a problem and the
corrective action to be taken. This troubleshooting guide can only be used by a qualifi ed service technician.
12
Troubleshooting
TROUBLESHOOTING GUIDE
Issues & Notes Possible Causes Solution
1. Blue fl ames 1. Cold start This is normal operation and the fl ames will begin to yellow as the burners and
logs heat.
2. Glowing embers not installed Ensure rockwool is placed per the installation instructions.
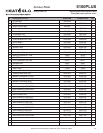
2. Odor from the appli-
ance
1. New appliance The appliance may release an odor for the fi rst several hours of operation from
paint curing and manufacturing oils burning off. This is normal and will dissipate
with time.
3. Appliance does not
turn on
1. No power to appliance Check breaker and disconnects to the appliance.
2. No power to HRV200PLUS Check breaker to HRV200PLUS and ensure ventilator is plugged in with the door
closed.
3. No signal from the appliance to the
HRV200PLUS; i.e., 12V DC not pres-
ent at “H1” terminal
Check the wall control ON/OFF switch. Check any accessory switches con-
nected to REM terminals. Replace as needed.
4. No signal from the HRV200PLUS to
the appliance; i.e., 12V DC not present
at “R1” terminal
Check HRV200PLUS circuit board for jumper between 12V and R2 terminals.
Install as needed.
5. Control wiring between appliance and
HRV200PLUS incorrect
Check wiring for correct connections and continuity.
6. Appliance circuit board wired incor-
rectly
Check appliance wiring per wiring diagram.
7. Inadequate draft Check HRV200PLUS fi lters - clean as needed.
Check HRV200PLUS exhaust termination - repair, clean or replace as needed.
Check appliance exhaust venting and connections. Ensure venting is not kinked
or crushed. Ensure all connections are properly installed and secured.
Check HRV200PLUS blower motor. Ensure motor is operating on high speed.
Check HRV200PLUS blower wheels. Ensure blower wheels are clean - service
as necessary per HRV200PLUS manual.
Check HRV200PLUS heat exchanger core. Clean and service as necessary per
HRV200PLUS manual.
Check any dampers installed in the appliance exhaust or HRV200PLUS exhaust
venting. Ensure dampers are properly set.
8. Pressure switch hose cracked or dis-
connected.
Check hose connecting fl ow sensor tube to pressure switch connector. Ensure
no cracks or kinks exist. Replace as needed.
9. Pressure switch bad Install a T-connector into the pressure switch tubing and connect a digital
manometer or magnahelic gauge. If pressure reads 0.15 in. w.c. or greater and
the pressure switch electrical contacts remain open, replace pressure switch.
10. Appliance circuit board bad Check appliance circuit board per the schematic shown in Figure 8.3. Replace
as necessary.
11. Flow sensor plugged Attach a hose to the fl ow sensor tube and attempt to blow through the sensor.
If the sensor is plugged, apply suffi cient pressure to clear the sensor. Always
assess the cause for fl ow sensor plugging.
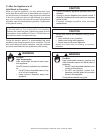
If sooting occurs in the appliance or if combustible
material is burned, the pressure switch ports could
close and prevent the appliance from operating. Refer
to HRV200PLUS manual.
CAUTION