


R
Page 10 7004-187F September 1, 2008
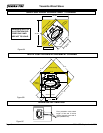
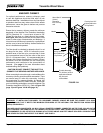
Yosemite Wood Stove
CONVERTING COLLAR FOR REAR VENT INSTALLATION
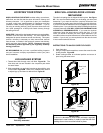
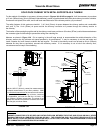
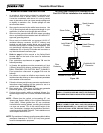
1. Lift off cast top. Remove 4 Phillips head screws from the
heat shield. Discard heat shield and save the screws.
Figure 10A
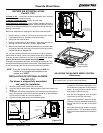
2. Remove 4 Phillips head screws from the rear shield, 2 on
each side, lift shield off and set aside. Figure 10D
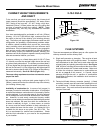
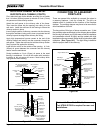
3.
Remove 1 bolt from each side of the flue transition.
and retrieve nuts attached to bolts. Use 3/8" and 7/16"
wrenches.
Figure 10B
4. Turn vent to horizontal position. Inspect sealant to ensure
a leak free application. Figure 10C
5 Manually snap off the knock-out section and discard. See
white outline in Figure 10A.
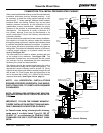
6. Reattach the rear shield on both sides.
7. Position the bracket (found in the component pack inside
the firebox) over the opening on the rear shield. Use
2 screws removed in Step #1 to secure the bracket.
Figure 10D
8. Place cast top on the unit.
Discard Heat Shield
Knock Out
Section
Figure 10D
Figure 10C
Figure 10B
Attach
bracket
to rear
shield
Bracket
2 screws on
each side
Figure 10E
Figure 10A
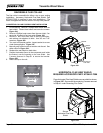
HORIZONTAL FLUE HEAT SHIELD
REQUIRED ACCESSORY PART: HTSHLD-7006
Place Horizontal Flue Heat Shield over rear shield as shown
in Figure 10E. Secure with the remaining 2 screws removed
in Step #1 under Reversing Flue Collar.
Secure
Horizontal Flue Heat
Shield
The flue collar is reversible for either a top or rear venting
installation. Accessory Horizontal Flue Heat Shield, Part
HTSHLD-7006, is required in rear vent installations. The
stove is shipped with the flue collar in the top vent position.
REVERSIBLE FLUE COLLAR