Section 2
Page 25
8990hrd.fm Installing the Pump Tube in the Sensor Body
2.3.1 Attaching the Intake Line
2.3.1.1 Attaching the Vinyl Tubing
The connection kit (Cat. No. 2248) contains two identical assemblies, one for
connecting vinyl tubing to the tubing attached to the sampler, and the other for
connecting the vinyl tubing to an intake strainer or remote pump. The kit
contains four hose clamps and two stainless-steel tubing connectors.
1. Push one end of the tubing connector into the vinyl tubing attached to the
controller until the tubing abuts the shoulder of the tubing connector.
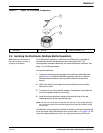
Secure with a tubing clamp (Figure 7).
2. Push the other end of the tubing connector into the vinyl tubing until the
tubing abuts the shoulder of the tubing connector and secure with a
tubing clamp (Figure 7).
3. Repeat Step 1 and Step 2 for the fitting that connects the vinyl tubing to
an intake strainer or a remote pump.
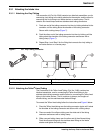
Figure 7 3/8” Vinyl Tubing Connector
2.3.1.2 Attaching the Teflon
®
-Lined Tubing
The Connection Kit for Teflon-lined Tubing (Cat. No. 2186) contains two
identical assemblies, one for connecting the Teflon-lined tubing to the
stainless steel tubing connector and the other for connecting the Teflon-lined
tubing to the intake strainer. The kit contains six clamps, two lengths of
silicone tubing, and two stainless-steel barbed fittings.
To connect the Teflon-lined tubing follow the instructions and Figure 8 below:
1. Place the Teflon-lined tubing over the tubing connector nipple until it abuts
the shoulder of the tubing connector and secure with a tubing clamp.
2. Place one end of the silicone tubing over the wide end of the tubing
connector and secure with a tubing clamp.
3. Slide a second tubing clamp over the other end of the silicone tubing.
Push the silicone tubing over the stainless-steel fitting on the intake
strainer and tighten the tubing clamp.
1. Vinyl tubing to controller 3. Tubing clamp (2 required)
2. Vinyl tubing to strainer or pump. 4. Stainless-steel tubing connector


