


– 17 –
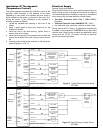
Water Heater Operation
Stacking
Stacking occurs when a series of short draws of hot water
(11 litres (3 US gallons) or less) are taken from the water
heater tank. This causes increased cycling of the burner and
can result in increased water temperatures at the hot water
outlet. A tempering device is recommended in the hot water
supply line to reduce the risk of scald injury.
Water Heater Sounds
During the normal operation of the water heater, sounds or
noises may be heard. These noises are common and may
result from the following:
1. Normal expansion and contraction of metal parts during
periods of heat-up and cool-down.
2. Condensation causes sizzling and popping within the
burner area and should be considered normal.
3. Sediment buildup in the tank bottom will create varying
amounts of noise and may cause premature tank failure.
Drain and flush the tank as directed under “Draining and
Flushing”.
Smoke/Odour
The water heater may give off a small amount of smoke and
odour during the initial start-up of the unit. This is due to the
burning off of oil from metal parts of a new unit and will dis-
appear after a few minutes of operation.
Anode Rod/Water Odour
Each water heater contains at least one anode rod, which
will slowly deplete while protecting the glass-lined tank from
corrosion and prolonging the life of the water heater. Once
the anode is depleted, the tank will start to corrode, eventu-
ally developing a leak. Certain water conditions will cause a
reaction between this rod and the water. The most common
complaint associated with the anode rod is a “rotten egg
smell” produced from the presence of hydrogen sulfide gas
dissolved in the water. Do not remove this rod perma-
nently as it will void any warranties, stated or implied. A
special anode can be ordered if water odour or discoloura-
tion occurs. This rod may reduce, if not eliminate, water
odour problems. The water supply system may require
special filtration equipment from water conditioning compa-
ny to successfully eliminate all water odour problems.
Artificially softened water is exceedingly corrosive because
the process substitutes sodium ions for magnesium and cal-
cium ions. The use of a water softener may decrease the life
of the water heater tank. The anode rod should be inspect-
ed every year. If the rod is more than 50% depleted, the
anode rod should be replaced.
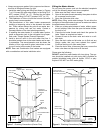
To replace the anode:
1. Turn off oil supply to the water heater.
2. Shut off the water supply and open a nearby hot water
faucet to depressurize the water tank.
3. Drain approximately 20 litres (5 US gallons) of water
from tank (Refer to “Draining and Flushing” for proper
procedures.) Close drain valve.
4. Remove old anode rod.
5. Use Teflon® tape or approved pipe sealant on threads
and install new anode rod.
6. Turn on water supply and open nearby hot water faucet
to purge air from water system.
7. Restart the water heater as directed under “Startup.”
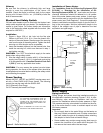
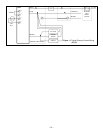
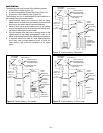
Anode Maintenance
A new anode is about 20mm (13/16 in.) to 22mm (7/8 in.)
diameter and has a steel wire core approximately 3mm (1/8
in.) diameter in the center. If the anode is less than approx-
imately 10mm (3/8 in.) in diameter, or the inner steel core is
exposed, the anode(s) should be replaced. Operating a
water heater without an actively working anode(s) will void
the warranty.
To check/replace the anode:
1. Turn "OFF" the electrical supply to the water heater.
2. Close the cold water supply valve.
3. Open a nearby hot water faucet served by the system
to depressurize the system.
4. Connect a hose to the drain valve and drain 22 litres (6
USG.) as directed in “Draining, Flushing and Sediment
Removal”.
CAUTION! The water being drained can be extremely
hot! The drain hose should be rated for at least 93
°
C
(200
°
F). If the drain hose does not have this rating, open the
cold water supply valve and a nearby hot water faucet
served by the system until the water flow is no longer hot.
Close the cold water supply valve and resume.
5. Remove the anode cover, or, on JWF657, Rear and
Combination flue models, remove top cover, insulation
and flue top cover.
NOTE: The anode(s) has been factory installed using a
power tool. It may be necessary for a second person to sta-
bilize the heater. A few sharp blows on the handle of the
socket wrench should loosen the anode nut. If an impact
wrench (power drive) is available, this is an easier way to
remove an anode.
6. Using a 1 1/16" socket (certain models require 1-5/16”)
, remove the anode(s) and inspect it. The surface may
be rough, full of pits and crevices, but this is normal. If it
is less than approximately 10mm (3/8 in.) in diameter, or
the inner steel core exposed, the anode(s) should be
replaced.
7. Apply Teflon® tape, or sealing compounds approved for
use with potable water, to the threads of the anode(s)
and install into the tank top.
8. Open the cold water supply valve and open a nearby
hot water faucet to purge air from the water tank as
directed in “Filling the Water Heater”.
9. Check for leaks. Repair as required, and re-test.
10. Replace the covers and insulation and turn the electrical
supply to the heater “ON”.
WARNING:
Keep the area around the heater clear and
unobstructed.