


22 307843
Service
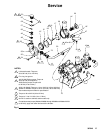
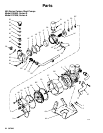
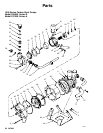
Repairing the Pilot Valve
NOTE: Air Valve and Pilot Valve Repair Kit 220656 is
available. See page 38 to order. Parts included in the
kit are marked with an asterisk, for example, (5j*). Use
all the parts in the kit for the best results.
Disassembly
1. Relieve the pressure.
WARNING
PRESSURIZED EQUIPMENT HAZARD
To reduce the risk of a serious injury whenever you
are instructed to relieve pressure, follow the Pres-
sure Relief Procedure on page 10.
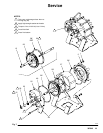
2. Unscrew the valve cap (5c) from each of the valve
housings (5d) and remove the parts. Clean and
inspect the parts for damage. See Fig. 9.
3. To replace the rod seal (5j*):
a. Cut a small slit in the tube ends (72* and 42*)
and disconnect them from the pilot valve fit-
tings (5h) and air valve tees (40n).
b. Unscrew the cap screws (37) and remove the
pilot valve housings (5d). Grease the rod seals
(5j*) and install one on each side of the pump.
c. Secure the pilot valve housings (5d) to the
pump with the cap screws (37).
d. Connect the new tubes (72* and 42*) to the
pilot valve fittings (5h) and air valve tees (40n).
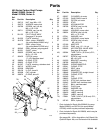
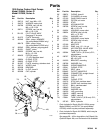
Assembly
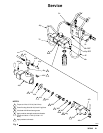
1. Apply lithium base grease to the inside and outside
of the air valve (5b), and to the o-rings and seals.
2. Install the o-ring (5e*), being sure to completely
seat it on the flat in the valve housing (5d). Install
the long end of the valve stem (5a) into the hous-
ing.
3. Install the small spring (5g) over the valve stem
(5a), the air valve (5b) over the spring, and the
larger spring over the air valve.
4. With the copper gasket (5i*) in place on the valve
cap (5c), screw the cap onto each of the valve
housings (5d). Torque the cap to 7.4 to 12.5 ft-lb
(10 to 17 NSm).