


10 307843
Operation
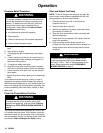
Pressure Relief Procedure
WARNING
The system pressure must be manually relieved to
prevent the system from starting or spraying acci-
dentally. To reduce the risk of an injury from acci-
dental spray from the gun, splashing fluid, or
moving parts, always follow the Pressure Relief
Procedure whenever you
D are instructed to relieve the pressure
D Stop spraying
D Check or service any of the system equipment
D install or clean the spray nozzle.
1. * Engage the spray gun or dispensing valve safety
latch.
2. Shut off the air supply.
3. * Disengage the gun or dispensing valve safety
latch.
4. * Hold a metal part of the gun or valve firmly to a
grounded metal waste container and trigger it to
relieve the fluid pressure.
5. * Engage the safety latch again.
6. Open the pump drain valve (required in system),
and have a container ready to catch the drainage.
7. Leave the drain valve open until you are ready to
spray again.
* Applies only when using a spray gun or dispensing
valve.
If you suspect that the spray tip, nozzle, or hose is
clogged or that pressure has not been fully relieved
after following the steps above, very slowly loosen the
hose end coupling and relieve pressure gradually, then
loosen completely, then clear the tip, nozzle, or hose
obstruction.
Flush the Pump Before First Use
WARNING
To reduce the risk of fluid injection injury, static
sparking and splashing, read and follow Flushing
Safety under FIRE OR EXPLOSION HAZARD on
page 5.
The pump was tested with lightweight oil, which is left
in to protect the pump parts. If this solution could con-
taminate the fluid you are pumping, flush it thoroughly
with a compatible solvent. To start the pump, follow the
procedure in Start and Adjust the Pump, below.
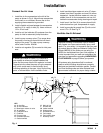
Start and Adjust the Pump
NOTE: Check all fittings to be sure they are tight. Be
sure to use a thread sealant compatible with the fluid
being pumped on all male pipe threads.
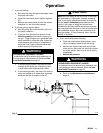
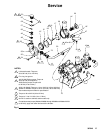
1. Place the suction hose (S) in the fluid to be
pumped. See Fig. 5.
2. Close the fluid drain valve (E).
3. With the air regulator (D) closed, open both bleed-
type master air valves (C).
4. Open the fluid control device while continuing with
the following steps.
5. Slowly open the air regulator (D). Adjust it until the
pump runs smoothly.
6. Allow the pump to cycle slowly until all air is
pushed out of the lines (the fluid will be flowing in a
steady stream from the fluid outlet) and the pump
is primed.
WARNING
To reduce the risk of component rupture, which
could cause serious bodily injury, never exceed
100 psi (0.7 MPa, 7 bar) air supply pressure to the
pump. Read the warning section EQUIPMENT
MISUSE HAZARD on page 4.