


9
Consumer Support
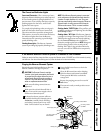
Operating InstructionsSafety Instructions
Care and Cleaning Troubleshooting Tips
Care and cleaning–RO cartridge replacement.
www.GEAppliances.com
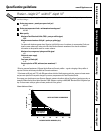
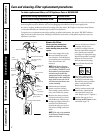
Flow Control and Screen
The flow control regulates the flow of water
through the Reverse Osmosis cartridge at the
required rate so high quality product water
is produced.
When servicing the Reverse Osmosis
system, check the flow control and tubing to
it, to make sure the tube and surrounding
surfaces are clean and unrestricted. A small,
cone-shaped screen is located in front of the
flow control to help keep it clean. If the flow
control or screen is plugged with foreign
particles, the Reverse Osmosis cartridge
cannot discharge minerals and impurities
to the drain. If this happens, it will only take
a short time for the cartridge to plug,
making it useless.
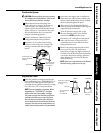
Make sure the red tank shutoff valve is
closed, water supply valve is closed (turn
clockwise), and the RO water faucet is
open to the system. Drain system until
water stops flowing.
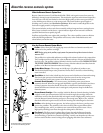
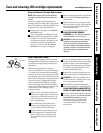
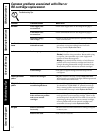
Locate the flow control and screen.
Remove the straight tubing from the
top of the Reverse Osmosis system.
Remove the flow control from the end
of the tubing with a clean knife edge.
Remove the screen; a toothpick may
be needed for the interior portion of
the cap.
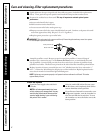
I
f you are replacing the flow control and
screen, discard them. If you are checking
the flow control, screen and tubing for
blockage, clean these parts of any debris.
Do not blow through the flow control.
It will contaminate the part.
Replace the screen by placing the cone
end into the cap and carefully push it in.
CAUTION:
Do not force in further after
you feel resistance. Visually check to be
sure it is properly positioned.
Install the flow control and tighten by
hand, then another 1/4 turn with pliers.
DO NOT OVERTIGHTEN AND DISTORT OR
CRUSH THE TUBING AND FLOW CONTROL.
If you are replacing the Reverse Osmosis
cartridge, return to the
Reverse Osmosis
Cartridge Replacement
instructions.
Otherwise, open red tank shutoff
valve and water supply valve (turn
counterclockwise). Close the RO
water faucet.
7
6
5
4
3
2
1
Reverse
Osmosis cap
Cone
screen
Flow control
Reverse Osmosis Cartridge Replacement
NOTE: When replacing the Reverse Osmosis
cartridge, also install a new flow control and
screen.
It’s time to replace the Reverse Osmosis
cartridge when the amber “RO” light on the
faucet base flashes continually while Reverse
Osmosis water is taken from the faucet.
Follow steps 1 through 5 in the
Remove
the Filters
section.
Place the prefilter cartridge back in the
Reverse Osmosis housing. Note “THIS
END UP” on one end. Then slide the
new Reverse Osmosis cartridge into the
prefilter end with 2 o-rings first. Also
note “up” arrow on side. See
Replace
the Filter
section, step 1 for diagram.
Remove and replace the flow control and
screen. See the
Flow Control and Screen
section below.
Lightly lubricate the cap o-ring seal with
only clean silicone grease. Then, push the
cap into position and install the clamp
sections and retainers.
Turn on the water supply valve and
PURGE THE REVERSE OSMOSIS
CARTRIDGE.
See the
Purging the Reverse
Osmosis System
section on page 5.
CAUTION: The Reverse Osmosis cartridge
contains
a food grade preservative that
should be purged from the system before
first use or whenever the Reverse Osmosis
cartridge is replaced. The preservative will
give product water an unpleasant
taste
and odor.
5
4
3
2
1