


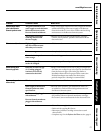

Care and cleaning–Filter replacement procedures.
Lightly lubricate the cap o-ring with only clean silicone grease (included with replacement
filters). Then, push the cap into position and install the clamp retainers and sections.
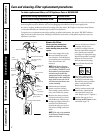
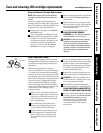
Evacuate the residual water from tank.
This step is important to maintain optimal system
performance.
a.
Assure tank shutoff valve is open.
b.
Hold container under shutoff valve.
c.
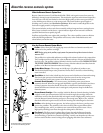
Locate vacuum relief valve under green cap.
d.
Depress vacuum relief valve; water should drain from tank. Continue to depress valve until
water flow approaches a drip. (Expect 1/2 to 1-1/2 gallons.)
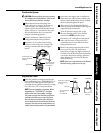
e.
Replace green protective cap on relief valve.
WARNING: This valve stem is for vacuum relief only. Pressurizing the tank may cause it to rupture.
Do not attempt to pressurize the tank
.
Assemble postfilter to unit. Remove protective caps from postfilter. Connect fittings of
postfilter tube, removed at step 7 in the
Remove the Filters
section, to tank shutoff valve and
top of postfilter. Connect fitting on tube from electronics box to bottom of postfilter. Snap
postfilter into holder. The flow arrow printed on the side of the filter should be pointed down.
Replace batteries in battery case with four new “AA” alkaline batteries. Note orientation “+”
and “–” of batteries. Weak batteries will give no or a false indication. Replacing batteries also
resets the six month clock and filter light will flash green.
NOTE: Lights may not operate properly until system has been allowed to refill tank. This takes
approximately 4 hours.
5
4
3
2
8
Green protective cap
Vacuum relief valve
Operating Instructions
Safety InstructionsCare and CleaningTroubleshooting TipsConsumer Support
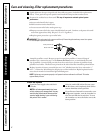
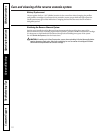
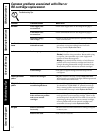
Check the System
Open the water supply valve and check
for leaks.
NOTE: It will take approximately four hours
to fully recharge your storage tank. You may
notice ticking sounds at the faucet and the
sound of water draining in your sink during
this period. This is normal.
After the tank is full, before first use, open
the RO faucet and completely drain tank to
remove harmless carbon particles.
If your Reverse Osmosis is connected to your
refrigerator icemaker, turn the icemaker on
after the tank fills the second time. To turn
the icemaker on, move the feeler arm to the
down position.
3
21