


7
Consumer Support
Operating Instructions
Safety Instructions Care and Cleaning Troubleshooting Tips
www.GEAppliances.com
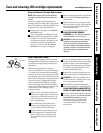
Sanitize the System
CAUTION: Before sanitizing, be sure to remove
all cartridges as described above. Chlorine will
destroy the Reverse Osmosis cartridge.
Fill the Reverse Osmosis housing with
fresh cold water, to about 1″ from the top.
Add one ounce (two tablespoons) of
ordinary 5.25% household chlorine bleach
(Hilex, Clorox, etc.) and mix into the water.
Do not add chlorine first. Concentrated
chlorine may damage plastics.
Replace the Reverse Osmosis cap with
o-ring and install the clamp retainers.
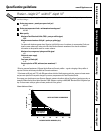
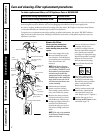
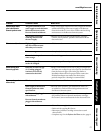
Disconnect 3/8
″
product water tubing
to faucet at electronics box. Connect the
tubing to tank shutoff valve. See figure
below.
Open the water supply valve to the Reverse
Osmosis system. Allow system to fill for one
minute. Open the RO water faucet, locking
the lever upward against the spout.
Allow water to flow through the Reverse
Osmosis system until all bleach odor is gone
(approximately 20 minutes).
Turn off the water supply valve to the
Reverse Osmosis system. Close the RO
water faucet
AFTER
water flow stops.
Disconnect 3/8
″
tubing from tank shutoff
valve, and reconnect to electronics box.
A small amount of water will drain when
fitting is disconnected.
Remove the clamp retainers and sections
from top of the unit. Lift the Reverse
Osmosis cap straight up (slight resistance is
normal) from the Reverse Osmosis housing
(no need to disconnect tubing) and move
aside. Dispose of water from the Reverse
Osmosis housing.
NOTE: If the cap o-ring remained in the Reverse
Osmosis housing, replace it on the cap.
8
7
6
5
4
3
2
1
Connect product water
tubing to tank shutoff
valve here
Electronics box
Disconnect product
water tubing (goes
to faucet) here
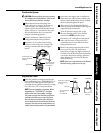
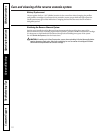
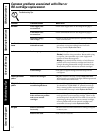
Replace the Filters
Place the prefilter cartridge in the Reverse
Osmosis housing. Note “THIS SIDE UP” on
one end. Then slide the Reverse Osmosis
cartridge into the prefilter end with 2 o-rings
first. Also note “UP” arrow printed side.
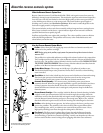
NOTE: Correct orientation is important. When
assembled, the “THIS SIDE UP” should be
visible on the end of the prefilter cartridge.
The plastic end piece on the Reverse Osmosis
cartridge should have no o-rings. See figure.
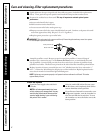
Also, the top end of prefilter has a brine seal
around the hole that seals to Reverse Osmosis
cartridge. This seal must be pointed down, not
visible, when the two parts are fully assembled.
1
Plastic piece of Reverse
Osmosis cartridge—
no o-rings
Brine Seal
Top end of prefilter
cartridge—
“THIS END UP”
CORRECT INCORRECT
Brine Seal
not visible
Brine Seal
turned up