


Page 28
REPLACEMENT PARTS AND REMOVAL INSTRUCTIONS
(Continued)
Removing and Replacing the Catalytic Combustor (Continued)
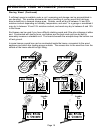
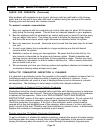
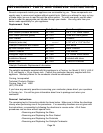
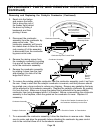
2. Reach into the firebox
and remove the baffle
that is along the roof of
the firebox right behind
the doors by sliding it
backwards and then
pivoting it down.
Remove the Baffle by
Sliding it Backwards
then Rotating it Down
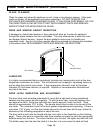
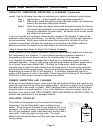
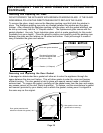
3. Disconnect the combustor
assembly from the combustor by-
pass control rods. The
combustor assembly will have to
be rotated down to allow the two
rods coming off of the assembly
to disconnect from the combustor
by-pass control rods.
Combustor By-Pass Control Rods
Combustor Assembly
Rotate Combustor
Assembly Down
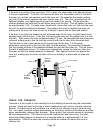
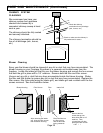
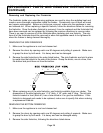
4. Remove the mixing screen from
the combustor assembly by pulling
it up and off the two rods that stick
out of the combustor assembly.
5. Remove the combustor assembly
by rotating it down from the front
and allowing it to slide off of the
ledge that it sits on.
Combustor Assembly
Remove
Mixing
Screen
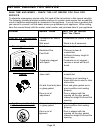
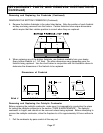
6. To remove the existing catalytic combustor from the combustor assembly, push it out from
the rear. Keep in mind that the catalytic combustor is ceramic, and that pressure should
be exerted over a large surface to reduce any chipping. Remove any gasketing that may
still be attached to the combustor assembly. Replace the catalytic combustor by pushing
it in from the front. Make sure to keep the gasket that is attached to the new catalytic
combustor from being damaged while it is inserted. Before re-assembling the combustor
assembly to the fireplace, check the gasket on the combustor for wear. Replace it if
necessary.
Combustor Assembly
Catalytic Combustor
Push the Old Catalytic Combustor Out of
the Combustor Assembly from the Rear
Check this Gasket for Deterioration
7. To re-assemble the combustor assembly, follow the directions in reverse order. Make
sure to center and align the assembly before attaching the combustor by-pass control
rods to the rods that come off of the combustor assembly.