


9
to prevent personal injury. When the glass door assembly is being transported, it must be wrapped in
newsprint and tape and/or a strong plastic bag. Do not operate with the glass front removed, cracked
or broken. Removal and replacement of the glass from the door must be done by a licensed or qualied
service person. The glass must be purchased from an ENVIRO dealer. No substitute materials
are allowed.
MAINTAINING FASCIA AND SURROUND FINISHES:
When a plated surround or face is received, it should be unpacked/unwrapped carefully to avoid getting
anything on the surface of the nish, including cleaners, polish and nger prints. If your ngers come into
contact with the nishes, the oils left as ngerprints on the plating can become permanently etched in
the surface. To prevent this, clean the painted surfaced with a damp cloth and clean plated nishes with
denatured alcohol after the installation and prior to rst ring of the replace. If your ngers come into
contact with the antique copper nish, the oils left as ngerprints on the copper can cause discoloration,
which will eventually turn green in that area. You can clean the patina or discolored areas of the antique
copper nish with “OO” 3M green sanding pads. These can be purchased from most hardware stores. On
the areas with discoloration, use the sanding pads to sand in the same direction as the brushed nish,
then blend the nish by feathering in the surrounding area. This renishing procedure has been approved
by the manufacturer and will not harm the nish. Please note: ANTIQUE COPPER IS THE ONLY FINISH
THAT CAN BE SANDED, DO NOT SAND PEWTER, GOLD OR NICKEL FINISHES.
BURNER AND BLOWER REMOVAL:
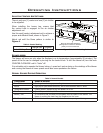
1. Turn the unit off, remove the glass door (see MAINTENANCE AND SERVICE - GLASS DOOR REMOVAL) and the
log set. Caution: Bleed lines before lighting and light pilot with door open.
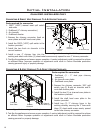
2. Remove the burner tray top by removing the two (2) T-20 screws located in the center of the burner
tray (see Figure 7). Slide tray to the left and lift out.
3. Remove brick panels (see SECONDARY INSTALLATION - BRICK PANELS INSTALLATION).
4. Remove the surround panel by lifting it straight up and then out to free it from the body of the unit.
5. Turn the gas supply off and remove gas connection and disconnect the wiring from the side of the
appliance.
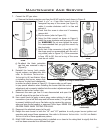
6. Remove the three (3) T-20 screws that hold the air deector in place on the back rewall (see Figure 7)
and undo the remaining screws that hold the burner assembly in the appliance. Carefully remove the
Maintenance And Service
gas tray assembly from the rebox,
ensuring that wires and gas lines are
not damaged.
7. Remove the blower and housing from
the gas tray assembly by removing
the fastening screws located on
the back of the gas tray assembly.
Disconnect the wiring from the fan
temperature sensor and remove.
To install; follow steps 1 through 7 in
reverse. Perform a gas leak check on all
gas line with a soap and water solution
or an approved method and check
burner and blower assembly for proper
operation.
Gas and electrical
tray complete
Air deflector
Burner top
Figure 7: Removing Burner and Gas Tray.