


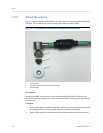


3.2.4 Prepare the sensor mount
Stud mount (preferred)
Stud mount provides increased reliability, improved frequency response, and increased
signal sensitivity.
Prerequisites
The mounting location must provide a flat surface of at least 0.5 in. (12.7 mm) in diameter
and a case thickness exceeding 0.4 in. (10.2 mm). If this is not possible, use the epoxy
mount method instead
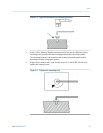
Procedure
1. Prepare the spot face or end mill tool by setting the drill bit depth to a minimum of
0.325 in. (8.255 mm).
2. Using a wire brush and plant-approved cleaner, clean and degrease the surface area.
3. Keeping the spot face and end mill tool perpendicular to the machine surface, drill
into the mounting location until the surface is smooth to the touch with no
noticeable irregularities. This may require the spot face tool to remove as much as
0.04 in. (1.016 mm) or more from the surface.
Note
If the spot face is not uniform on all sides, it indicates that the spot face tool is not
perpendicular to the mounting surface, and the resulting surface will not allow the sensor to
be mounted properly. See Section A.7 for illustrations of the correct milling process.
4. Using 1/4-28 in. tap set, tap a pilot hole to a minimum depth of 0.25 in. (6.35 mm).
See Section A.7 for an illustration of tapping a pilot hole.
Epoxy mount (alternative)
If it is not practical to drill into the machine casing, then the epoxy mount method is
acceptable.
Procedure
1. If the equipment surface has a radius of curvature that is less than 4 in. (100 mm),
grind a flat surface approximately 0.5 in. (12.7 mm) in diameter.
2. Using a wire brush and plant-approved cleaner, clean and degrease the surface area.
3. Using a 2-part epoxy (such as Emerson P/N A92106), spray the activator onto the
mounting surface. Place a light coat of epoxy on the surface of the mounting pad
and hold firmly against the machine spot face surface for 1 minute.
Note
If the adhesive does not set within 1 minute, it indicates that too much epoxy is applied or
that the mounting surface is not prepared properly. Repeat steps 2–3.
Setup
MHM-97408, Rev 15 73