


EARTHSTONE OVENS PRE-ASSEMBLED INSTALLATION INSTRUCTIONS---U.L. LISTED 4
A. INSTALLATION PROCEDURES
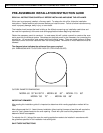
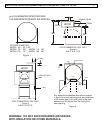
1. Mark an outline on the floor of the location desired. This is to assure that you have adequate
space. Refer to Fig. 1, pg. 6.
2. Check that there is adequate clearance at the ceiling for the hood. There must be a minimum of
3 inches of clearance between the top of the hood and/or oven and the surface of the drywall
above. A height of 105 inches is needed for a basic installation (Including hood). If direct
venting is used then 83 inches will be sufficient (Model 60 – 65”). (Refer to Fig. 2 & 3 pg. 6)
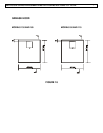
3. Check that there is a minimum clearance of 1 inch to any adjacent sidewall construction
containing combustibles. Any adjacent combustible sidewalls which projects beyond the front
of the oven opening must be a minimum of 48 inches, measured from the side of the oven
opening closest to the wall to the surface of the wall. (Refer to Fig. 4, pg. 6). If the distance is
less than 48 inches a wall shield must be mounted on the wall. Refer to the U.L. listed wall
shield installation instructions for the allowable clearance reduction.
Any adjacent combustible floor which projects in front of the oven opening must be a minimum
of 30 inches away from each side of the door opening and 36 inch from the front of the door
opening.
WARNING: DO NOT PACK REQUIRED AIR SPACES WITH INSULATION OR OTHER
MATERIALS
A minimum of 3 inches must be maintained between any combustibles and the top of the
metal covering over the oven enclosure. Refer to Fig 2 & 3 pg. 6.
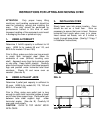
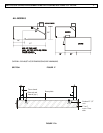
4. Once the oven is in the desired position, drill holes for the anchor bolts (Min 3 inches deep) using
the base plates as a guide. Insert ramset red heads to fasten oven base plates to
concrete floor. (Fig 17-A pg. 8)
5. The outside surface of the oven enclosure may be faced with non-combustible facing
material if desired. This might include but not limited to: Brick, Ceramic tiles, Stainless
steel, Marble or any other decorative metals. DO NOT FACE WITH COMBUSTIBLE
MATERIALS OR USE COMBUSTIBLE ADHESIVES. Allow for access to top of the
oven for servicing.
NOTE: FOR HEALTH DEPARTMENT REQUIREMENTS ANY 1-INCH AIR GAP
ADJACENT TO A COMBUSTIBLE WALL MUST BE SEALED WITH A NON
COMBUSTIBLE STRIP. i.e. ALUMINUM, STAINLESS STEEL OF TILE.
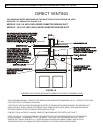
B. VENTING APPLICATIONS
THERE ARE TWO METHODS OF VENTING THAT ARE ACCEPTABLE TO USE WITH THE OVEN.
THE METHODS ARE A U.L. LISTED GREASE DUCT/BUILDING HEATING APPLIANCE CHIMNEY
INSTALLATION (DIRECT VENTING) AND TYPE-I EXHAUST HOOD INSTALLED PER NFPA 96 AND
THE UMC. DETERMINE WHICH METHOD OF VENTING IS ACCEPTED BY THE LOCAL BUILDING
DEPT. BEFORE BEGINNING INSTALLATION OF THE OVEN. RESIDENTIAL APPLICATIONS WILL
USE THE DIRECT VENTING METHOD. IT IS NEVER APPROPRIATE TO USE “CLASS A” OR “B
VENT” IN ANY PART OF THE EXHAUST SYSTEM. EXHAUST SYSTEMS SERVING SOLID-FUEL
EQUIPMENT MAY NOT BE COMBINED WITH EXHAUST SYSTEMS SERVING OTHER (NON-SOLID
FUEL) COOKING EQUIPMENT
Important: Chases should be made of non-combustable materials.