


www.desatech.com
122663-01D 9
CLEANINg
WARNING: Always discon-
nect power and allow the heater
to cool before performing any
cleaning, maintenance or reloca-
tion of this heater. Turn controls
to OFF and remove plug from
outlet or turn off circuit breaker
to heater.
CLEANING FIREBOX
1. Open bi-fold doors and screens.
2. Using a brush vacuum attachment, gently
clean compartment.
3. Close screens and doors.
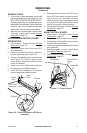
Removing Bifold Glass Doors
Bifold doors may be removed for replacing
or cleaning.
1. Partially open each door and press up on
upper spring clip with a screw driver until
outer top pivot pin is free of the clip.
ACCESSORY INSTALLATION
Continued
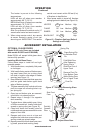
2. Fully fold frame assembly and slide upper
edge towards center of rebox opening
until the guide pins are free of the frame
rail (see Figure 11, page 8).
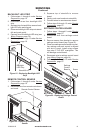
CLEANING BACK SCREEN (GLASS)
1. The glass is cleaned in the factory during
assembly. During shipment, installation,
handling, etc. glass surface may collect
dust particles. These can be removed
by bufng lightly with a clean damp cloth
(water only). Glass should be completely
dried with a lint free cloth or paper towel.
2. To access glass to clean, follow steps
1 through 5 under Service Preparation,
page 10.
3. Using gloves, gently remove glass panel
by sliding it toward you. There is a rubber
bumper on each corner of glass.
4. Clean glass as instructed in step 1.
5. Follow steps 8 through 13 under Service
Preparation, page 10.
SERVICINg
WARNING: Turn off appliance
and let cool before servicing.
Only a qualied service per-
son should service and repair
heater.
For questions regarding replacing parts, see
page 13.
Note: All service procedures are performed
through front face opening of replace.
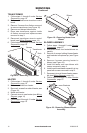
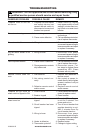
REPLACING LOG
1. Turn off power to unit (circuit breaker).
2. Open upper control panel door. Turn
power switch off.
3. Open bi-fold doors (if equipped) and
screens.
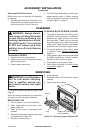
4. Remove screws securing each side of log
to brackets (see Figure 13).
5. Carefully remove old log.
6. Install new log.
7. Reinstall screws into brackets to secure
new log.
8. Close screens and doors.
Figure 13 - Removing Log and Ember LED
Log
Ember LED Strip
with Standoffs
Screw