


www.desatech.com
122663-01D10
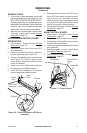
REPLACING SCREENS
1. Open upper control panel door. Turn
power switch off.
2. Open bi-fold doors (if equipped).
3. Remove 2 screws securing screen rods
(see Figure 14).
4. Tilt rod down and remove from bracket.
5. Remove old screen from rod and discard.
Install new screen onto rod.
6. Reinstall rod into bracket and replace
screws.
7. Close doors.
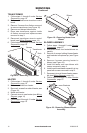
SERVICINg
Continued
2. Open bi-fold doors (if equipped) and
screens.
3. Remove screws securing each side of log
to brackets (see Figure 13, page 9).
4. Carefully remove log.
5. Remove screws from back corners and
front of top panel (see Figure 15). Remove
top panel and set aside.
Note: For LED drum and motor, only
remove back screws. Top panel does not
have to be completely removed. Care-
fully push top panel up to remove screen
glass.
6. Using gloves, gently remove glass panel
by sliding it toward you. There is a rubber
bumper on each corner of glass. Set aside
in a safe location.
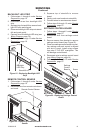
7. Follow instructions on pages 11 thru 13 to
replace part.
8. Using gloves, install glass by gently slid-
ing, smooth side toward replace front,
into brackets on either side that hold glass
in place.
9. Reinstall top panel. Pull top panel down
so that screen glass seats into glass
retainer.
10. Reinstall screws from step 5.
11. Reinstall log.
12. Reinstall screws into brackets to secure
log.
13. Close screens and doors.
14. Turn on power to unit (circuit breaker).
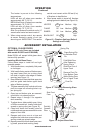
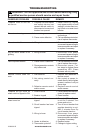
Figure 14 - Removing Screen/Rod Assembly
Screen
Rod
Retaining
Screw
Mounting
Holes
REPLACING EMBER STRIP
1. Follow steps 1 and 4 under Replacing Log,
page 9.
2. Locate ember LED strip (see Figure 13,
page 9). Disconnect wire (right side).
3. Remove ember LED strip by squeezing
top of standoffs and discard.
4. Being careful not to break LED strip, press
new ember LED strip onto standoffs.
5. Reconnect wire to LED strip.
6. Follow steps 5 through 7 under Replacing
Log, page 9.
SERVICE PREPARATION
Perform steps 1 through 4 below, then locate
part that needs replacing in the instructions
that follow.
1. Open control panel door. Turn off power
to unit (circuit breaker).
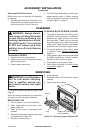
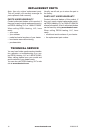
Figure 15 - Removing Screen Glass (all
parts not shown for clarity)
Screen Glass
Control
Panel
Door
Top Panel