


www.desatech.com
122663-01D6
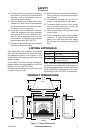
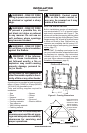
WARNING - RISK OF FIRE!
Wiring to power source must not
be pinched or against a sharp
edge.
WARNING - RISK OF FIRE!
To prevent a possible re, do
not block air intake or exhaust
in any manner. Do not use on
soft surfaces where openings
may become blocked.
WARNING - RISK OF FIRE!
Do not blow or place insulation
against the rebox.
WARNING: If the informa-
tion in these instructions is
not followed exactly, a re or
explosion may result causing
property damage, personal in-
jury or death.
Do not store or use gasoline or
other ammable vapors in the vi-
cinity of this or any other heater.
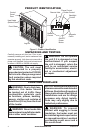
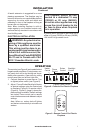
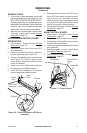
A junction box is provided to hard wire unit to
either a 15 amp (120/60) or 20 amp (240/60),
120 Volt 60 Hz grounded circuit.
Tools and building supplies required for
installation:
• Saw • Square
• Pliers • Gloves
• Hammer • Level
• Phillips screwdriver • Surround
• Framing materials • Electric drill/bits
• Tape measure
• Wall-nishing materials
• Caulking material
CAUTION: Provide adequate
clearances around the air open-
ings and adequate accessibility
clearances for servicing and
proper operations.
WARNING: Control panel
door on this heater cannot, in
any way, be covered as it may
create a re hazard.
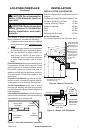
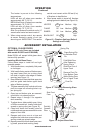
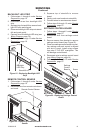
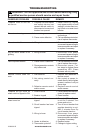
BUILT-IN INSTALLATION
Built-in installations require a framed enclo-
sure constructed of 2" x 4" or heavier lumber
and sized in accordance with Figure 6. This
allows unit to slide into opening and be nailed
to stud at sides and top nailing anges. These
anges accept 5/8" drywall or plywood board
to nish unit ush to face. Optional trim ac-
cessories are available that will extend 1/2"
over rough edge of wall opening (see Acces-
sories, page 17).
IMPORTANT: If installing a perimeter trim kit,
you must install shoulder screws before insert-
ing replace into opening. See instructions
included with trim kit. If installing a mantel,
you must follow clearance instructions (see
Installation Clearances, page 5).
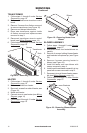
41
1
/
4
"
7
1
/
2
"
36
1
/
2
"
Platform/Subflooring
Figure 6 - Framing Dimensions
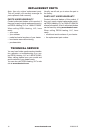
42
3
/
8
"
29
3
/
8
"
58
1
/
4
"
1 1
5
/
8
"
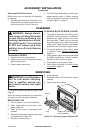
These Dimensions
Allow for 1 1
5
/
8
" of
Clearance to Side
Wall of Fireplace
and 10' Clearance
to Perpendicular
Side Walls
Figure 7 - Corner Dimensions
INSTALLATION
Continued