


www.desatech.com
122663-01D8
The heater is pre-set to the following
temperatures:
HIGH will shut off when room reaches
approximately 86° F (30° C).
MEDIUM will shut off when room reaches
approximately 79° F (26° C).
LOW will shut off when room reaches
approximately 72° F (22° C).
Note: Fan on heater will continue to run for 5-7
seconds after heater has been turned off.
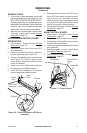
3. When using remote control, aim remote
at sensor located in center of unit just
above log set. IMPORTANT: This remote
control must remain within 20 feet (6 m)
of replace to be effective.
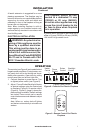
4.
When power switch is turned off, replace
settings go back to default (see Figure 10).
Figure 10 - Fireplace Settings (Default
Settings are Circled)
OPERATION
Continued
HEATER Off Low Medium High
FLAME Off Low Medium High
EMBER Off Low Medium High
BACKLIGHT Off Low High
ACCESSORY INSTALLATION
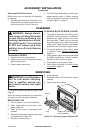
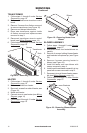
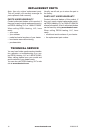
Figure 11 - Installing/Removing Glass
Doors
Spring Clip
Press Spring Clip
to Release Pivot
Pin
Remove Pivot Pin
From Bottom Face
While Sliding Door
Out of Upper Track
Pivot Pin
Fold Bifold Door
After Releasing
Spring Clip to
Slide Door Out of
Upper Track
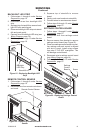
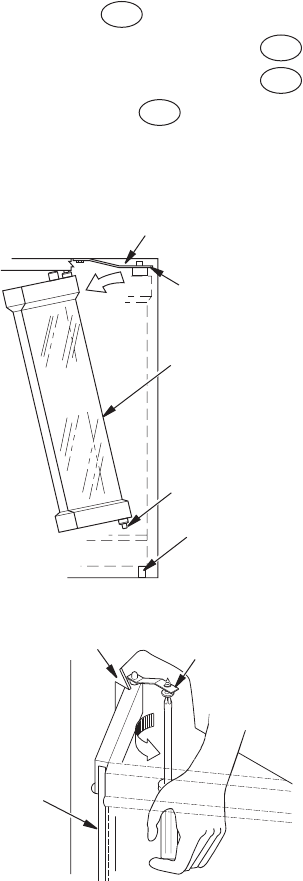
Figure 12 - Adjust Glass Door
Spring Clip
Partially
Opened
Door
Side Front
Face
OPTIONAL GLASS DOORS
(Model EL36L only. Doors are included
with models EL36LD and VE36LBHB)
Model EL36L will accept bifold glass doors
that are fully operable
Installing Bifold Glass Doors
Follow these steps to install left and right
operable panels:
1. With handle down, completely fold panel
on its hinges.
2. With handle facing center of rebox open-
ing insert lower pivot pin on door panel
into hole in bottom outer edge of rebox
opening (see Figure 11).
3. Keep folded door tilted and slide upper two
pins into guide track below upper facial
edge of rebox opening.
4. Tilt glass assembly fully vertical until outer
pivot pin snaps into mounting hole in up-
per spring clip.
5. Once top and bottom pins are secured,
unfold door into closed position.
6. Repeat steps 1 through 5 for opposite
door assembly.
7. To adjust doors, slide partially open. Using
a Phillips screwdriver, loosen hold-down
screws on spring clips (see Figure 12).
8. Close both doors until evenly joined at
middle and note gap as measured to outer
edges of front face.
9. Reopen each door one at a time and
retighten the hold-down screw while pre-
serving noted gap at each edge.
10. Repeat process until both doors are even-
ly joined, spaced and working freely.