


25
25
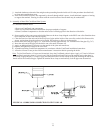
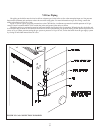
j) Attach the intake tee to the end of the straight section protruding from the inside wall. Use the procedure described in (d)
to clean and assemble these parts.
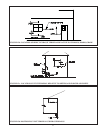
k) If the inside terminal section is not supported by the wall through which it passes, install additional supports or bracing
to support the terminal. Bracing in contact with the coaxial section of the terminal may be combustible.
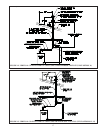
4) Assembly of Metal-Fab Corr/Guard Vent System:
a) Corr/Guard General Notes:
• Do not cut Corr/Guard vent components.
• Refer to Corr/Guard installation instructions for proper methods of support.
• Orient Corr/Guard components so that the males ends of all fi ttings point in the direction of the boiler.
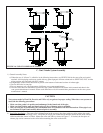
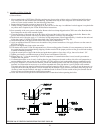
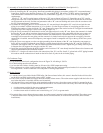
b) Start assembly of the vent system at the boiler. Remove the hose clamp shipped on the BWC vent collar. Bend the three
hose clamp tabs on this collar outward slightly.
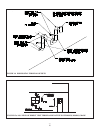
c) Clean the exterior of the male end of the fi rst piece of pipe and the inside of the vent collar on the boiler. Remove dirt,
grease, and moisture from the surfaces to be sealed. Dry surfaces or allow to dry thoroughly.
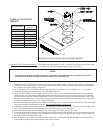
d) On the male end of the pipe, apply a ¼” wide bead of silicone approximately 1/2” from the end of the pipe (Fig 7.47).
e) Insert the male end of the pipe into the boiler vent collar until it bottoms out.
f) Apply an additional bead of silicone over the outside of the joint and smooth out.
g) Replace and tighten the clamp on the vent collar.
h) Assemble remaining Corr/Guard components in accordance with the Corr/Guard installation instructions.
i) Allow the silicone to cure per the silicone manufacturer’s instructions before operating the boiler.
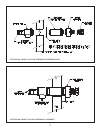
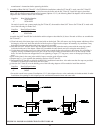
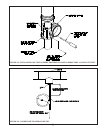
Note: To join Corr/Guard to a Crown coaxial terminal, leave the Corr/Guard gasket in place. Apply a ¼” bead of silicone
to the terminal connection about ¼” from its end. Slip the Corr/Guard female end over the terminal end so that there is
an overlap of approximatley 1 ¾ inches. Apply and smooth silicone over the outside of the joint including the tabs in the
female end of the Corr/Guard pipe. Tighten the terminal hose clamp to mechanically lock the pipe onto the terminal.
FIGURE 19: CORR/GUARD CONNECTION TO VENT COLLAR