


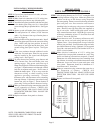

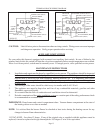
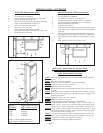

ROUGH-INS FOR REAR OR SIDE DISCHARGE
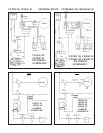
Install plastergrounds as shown in Figure 12 and Figure 13.
NOTE: When side discharge is being used, furnace should be set exactly 4” from side wall.
14-3/8”
10-3/
16”
Plaster
Ground
SIDE
FIGURE 13
REAR
FIGURE 12
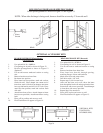
OPTIONAL ACCESSORY KITS
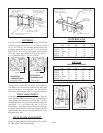
REAR REGISTER KIT (Flush Mount)
(See Figure 14)
1. Use optional kit No. 406RR-A.
2. Cut openings in drywall as shown in Figure 12.
3. Position plasterground as shown in Figure 12
(Optional).
4. Cut out and remove embossed section on casing
rear.
5. Remove knockout on inner liner.
6. Put heater into position.
7. Place inner boot into position, mark and cut boot
flush with wall. Place damper into cutout end of
inner boot, mark (4) holes from damper onto inner
boot, top and bottom, and drill (4) 1/8” hole. Place
outer boot into position, mark and cut boot flush
with wall.
8. Attach inner boot to liner. Attach damper to inner
boot (screws provided). Attach outer boot to casing
back.
9. Place grill in position and secure to wall.
10. Final installation will appear as Figure 14.
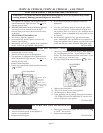
REAR DISCHARGE KIT (Recessed)
1. Use optional kit No. 407RR-A.
2. Cut openings in wall as shown in Figure 13.
3. Cut out and remove embossed section on casing
rear.
4. Remove knockout from inner liner.
5. Place inner boot from kit through opening,
matching flanges of boot and knockout.
6. Mark screw holes and remove boot.
7. Drill holes with a 1/8” drill.
8. Repeat steps 5 & 6 for outer boot.
9. After unit has been set in wall, shove the inner
boot through the back wall and up against the liner.
Secure boot with screws provided. Attach damper
to inner boot with screws provided.
10. Repeat Step 9 for outer boot.
11. Place grille in place and secure to wall.
12. Final installation will appear as Figure 15.
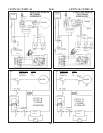
FIGURE 14
FIGURE 15
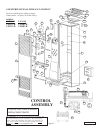
(OPTIONAL KITS
CONTINUED -
REVERSE SIDE)
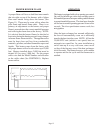
Plaster
Ground
14-11/16”
14-1/2”
1/2”
Page 16