


20
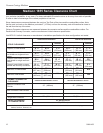
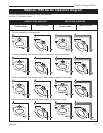
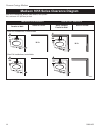
Vermont Castings Madison
30001453
Let the fire in the stove go out and allow the stove to
cool completely before beginning any maintenance
procedure.
Care of the Cast Iron Surface
An occasional dusting with a dry rag will keep the
painted cast iron of your Madison looking new.
The stove’s paint can be touched up as needed. First,
clean the areas to be painted with a wire brush. Then,
touch up the stove with Vermont Castings high tem-
perature stove paint. Apply the paint sparingly, and
keep in mind that two light coats of paint are better than
a single heavy one.
Care of Porcelain Enamel Finish
Use a dry or slightly damp rag or a soft brush to remove
spills or stains. For difficult jobs that require a cleaning
agent, use only a kitchen appliance cleaner or polish
recommended for use on enamel surfaces.
Cleaning the Glass
Most of the carbon deposits on the glass will burn off
during hot fires. However, the ash residue that accumu-
lates on the glass surface should be removed regularly
to prevent etching. Follow this procedure to clean the
glass:
• Be sure the glass is completely cool.
• Clean the glass with water or a cleaner made espe-
cially for this purpose. Do not use abrasive cleaners.
• Rinse the glass thoroughly.
• Dry the glass completely.
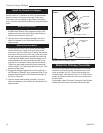
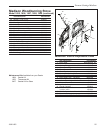
Glass Replacement
Replace glass only with Vermont Castings glass pan-
els. The glass panel rests on a cushion provided by a
gasket, and is held in place by two clips. The glass is
coated on one side which is slightly colored. Remove
the door from the stove and place it on a sturdy, level
work surface. Use a towel to protect the porcelain
enamel finish.
1. Remove the Retainer Clips. (Two phillips head
screws on each clip).
2. Inspect the Gasket. If the window gasket is in good
condition, you can leave it in place. If you replace it,
use only Vermont Castings gasket 1203556. Be sure
the channel around the window opening is clean,
and free of dust.
Place the gasket into the panel inset.
3. Install the Glass. Lay the glass on the inner gasket
with the coated side down, marked “This Side Out”
(toward the outside of the door). Tighten the screws
snugly, but loose enough to allow for a little move-
ment of the glass when the stove is in operation.
Overtightening can crack the glass immediately or
cause it to crack if it is unable to expand when hot.
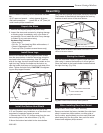
Gasket Replacement
Your Madison uses rope-type fiberglass gaskets to
make a tight seal between some parts. With use, par-
ticularly on those parts that move, gaskets can become
brittle and compressed and can begin to lose their ef-
fectiveness. These will need periodic replacement.
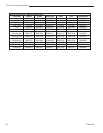
The sizes of replaceable gasket are listed below, along
with their applications.
Gasket Size
3/8” Fiberglass Door Gasket - 1203589
Wait until the fire is out and the stove has cooled. Be
sure to follow the standard safety procedure for working
with dusty materials: Wear safety goggles and a dust
mask.
Step 1. Remove the existing gasket by grasping an
end and pulling firmly.
Step 2. Use a wire brush or a screwdriver to clean
the channel of any remaining cement or bits of gasket.
Remove stubborn deposits of cement with a cold chisel
if necessary.
Step 3. Determine the correct length of the appropri-
ate-sized gasket by laying it out in the channel. Allow
an extra 1-2” (25-50 mm), and mark the spot to be cut.
Step 4. Remove the gasket from the channel, place it
on a wood cutting surface, and cut it at the marked spot
with a utility knife.
Twist the ends slightly to discourage the gasket from
unraveling.
Step 5. Lay an unbroken 1/8” (3 mm) bead of gasket
cement in the newly-cleaned channel.
Step 6. Starting at one end, press the gasket into the
channel.
Ensure a good joint where the gasket meets before
trimming any excess. Do not overlap the gasket ends
or leave ends with ragged edges.
Step 7. Press the gasketed part firmly against its
normal mating surface to seat the gasket evenly in its
channel. Close and latch the door to do this; close the
door on a piece of waxed paper to keep the cement
from migrating onto the non-gasketed part, or mask
other parts
Step 8. Clean excess cement from around the chan-
nel. Let the cement that holds the new gasket dry
thoroughly.
Maintenance