


15
Vermont Castings Madison
30001453
ST465
Seville
Install
bottom heat shield
You will need the following tools to assemble the Madi-
son:
• 9/16” open end wrench • safety glasses & gloves
• flat head screwdriver • power drill w/ 1/8” (3mm) bit
• stub handle phillips screwdriver
Unpack the Stove
1. Remove the shipping straps and plastic wrap.
2. Inspect the stove and contents for shipping damage
or missing parts. Immediately notify your dealer of
any damage. Do not install this stove if any damage
is evident or any parts are missing.
Hardware Bag contents:
• Stove Legs, 4
• 3/8-16 x 1¹⁄₄” hex head Leg Bolts with washers, 4
• Owner's Registration Card
• Touch-up Paint (Porcelain enamel stoves only)
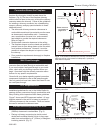
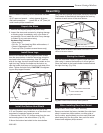
Install Stove Legs
Remove and discard the four large slot-head screws
from the stove bottom. Install the stove legs using the
hex head bolts from the parts bag. Use 3/8” washers
with all four legs; the door handle holder installs on the
right front leg. Position the holder so the hole to ac-
cept the handle hub faces out from the right side of the
stove. Tighten the bolts firmly. CAUTION: Overtighten-
ing can strip tapped threads.
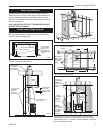
Assembly
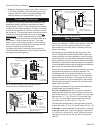
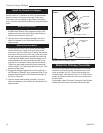
Install the Bottom Heat Shield
The #1892 Bottom Heat Shield must be used in the
U.S. and Canada in any installation on a floor that is not
comprised of unpainted cement on earth.
1. Remove the 1/4-20x 1/2” phillips screw from the cen-
tral mounting boss in the stove bottom. (Fig. 25)
2. Mount the bottom heat shield to the stove bottom
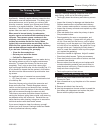
Fig. 25 Attach the Bottom Heat Shield to the boss in the
center of the stove bottom.
1/4-20 x 1/2” Pan Head Screw
ST465
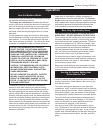
Storing the Handle
Use the removable handle to open or close the doors.
After using it, remove the handle so it will not get hot.
Store the handle in the handle holder installed behind
the right front leg. (Fig. 25a)
using the same phillips head screw previously removed.
The corners of the shield will butt against the cast leg
locators at each corner of the stove bottom.
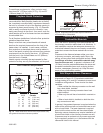
When Installing Rear Heat Shield
Models 1655, 1656, 1567, 1658, 1659 only.
Remove and retain the factory installed flue collar heat
shield. Loosen two phillips screws, on either side of
the flue collar, approximately one turn each.Slide heat
shield away from the flue collar, then push flue collar
forward and retighten phillips screws.
ST564
handle holder
12/13/00
Bottom Heat Shield
Door Handle Holder
Leg Bolt and Washer
ST564
Fig. 25a Handle holder and heat shield positions.
ST466
Seville
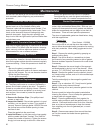
Attach legs
Fig. 24 Attach the stove legs with leg levellers.
Leg Bolt and
Washer
Leg Leveller
ST466