


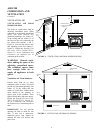

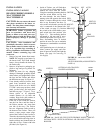
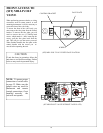

7. Loosen – Do Not Remove the
two (2) rear side bolts of the
stove, (one (1) on the left rear
side, and one (1) on the right rear
side). Then place a Mounting
Bracket (Mounting Brackets
provided and packaged with Log
Heater Base) between the Bolt
head and the stove body. Ensure
that the other end of the
Mounting Bracket is placed on
the heater base between the Rear
Log Support and the Rear Burner
Holder. Tighten the Bolts (See
Figure 11).
8. Position logs on base as shown
on page 10, Figure 13.
IMPORTANT: Make sure log
does not cover any burner ports
and does not touch the stove
cavity .
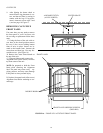
9. Position back panel with label at
lower left corner. Fasten with
bolts at each bottom corner. Do
not tighten completely. Taking
small heat shield provided with
log base position it over back
panel, align two (2) slotted holes
in heat shield with the two (2)
holes in the top of the back panel.
Now fasten the heat shield to the
back of the stove. Start the two
(2) remaining bolts, now tighten
all six (6) bolts. NOTE: Do not
over-tighten bolts. Porcelain on
back panel may crack. (See
Figure 12)
10. Place freestanding stove in de-
sired position in room. Be sure to
maintain clearances to com-
bustibles as outlined on page 6.
NOTE: After positioning stove in
desired position, connecting gas
supply and completing all pressure
checks and lighting the heater, make
sure flame is not contacting logs. If
flame is contacting logs, reposition
logs so flame does not contact logs.
NOTE: Heat Shield is provided with
the Log Heater Base unit.
NOTE: Back Panel is provided with
the Stove unit.
INSTALLATION
Continued
INSTALLING GAS LOG
HEATER (BASE) MODELS
MA C100BATLP OR
MA C100BATNAT
CAUTION: Do not remove the
metal data plates attached to the
heater base assembly. The data
plates contain important warranty
information.
WARNING: Failure to position the
parts in accordance with theses
diagrams or failure to use only parts
specifically approved with this
heater may result in property
damage or personal injury.
CAUTION: After installation and
periodically thereafter, check to
ensure that no flame comes in
contact with any log. With the
heater set to High, check to see if
flames contact any log. If so,
reposition logs according to the log
installation instructions in this
manual. Flames contacting logs will
create soot.
1. Remove log and gas log heater from
carton. NOTE: Do not pick up gas log
heater by the burner itself. This could
damage heater. Always handle the gas
log heater by the heater base only.
2. Remove all protective packaging
applied to log and gas log heater for
shipment.
3. Check all items for any shipping
damage. If damaged, promptly inform
dealer where you bought heater.
4. If not already removed, remove back
panel from assembled stove body, if
equipped (See Figure 5, page 7). Use
an adjustable wrench or a 10mm
socket. Remove six (6) bolts and
washers. Keep bolts and washers to
reattach back panel later.
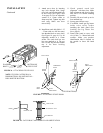
5. Facing rear of stove body place gas
log heater base inside stove with
control knob facing inner rear side of
the stove.
6. Slide the Gas Log Heater Base
forward until the front of the base is
against the inner front rear side of the
stove (See Figure 11).
FIGURE 11 - INSTALLING
LOG HEATER
FIGURE 12 - BACK PANEL AND
HEAT SHIELD
BACK STOVE PANEL
NOTE: Mounting
Brackets must be
placed between the
Rear Log Support
and the Rear Burner
Holder. Brackets
must be tightened
before Back
Panel is replaced.
9
MOUNTING BRACKET
REAR LOG
SUPPORT
SIDE
BOLT
TWO (2) TOP BOLTS
HOLD THE HEAT
SHIELD IN PLACE
FOUR (4) BOLTS
TOTAL OF (6) SIX
BOLTS
BACK STOVE PANEL
9